PDFelement - Edit, Annotate, Fill and Sign PDF Documents

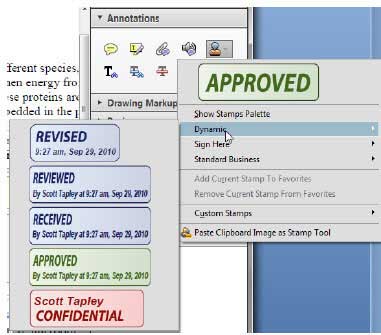
In business world, you have to exchange documents repeatedly with your partners and workmates, right? And during the process, you should denote the status of the PDF documents by marking the PDF documents every time? This is a formula you need to go through. And sometimes you even need to point out where to sign the PDF. To make it easier for others to know what's going on with the PDF documents, contracts, projects, receipts, etc, the easiest way is adding dynamic stamps to the PDF files. Adobe Acrobat offers the option of adding dynamic stamps to PDF documents and you will know steps to add stamps to PDF via Acrobat X Pro in this article. If you need to edit the stamps after creating them, you can try a better cost-effective solution.
| Items |
 
|

|
|---|---|---|
| Annotate PDF |
Add stamps, create custom stamps, make modification to stamps. Add notes, text box, typewriter, area highlight, drawing etc. |
Make comments to PDF. |
| Edit PDF |
Make modification to PDF text, pages, images, links. Edit scanned PDF by OCR. |
OCR feature is not available in Adobe Acrobat Standard DC. |
| Price for Full Version |
$69.95 |
$299 |
| Running Speed | ||
| Simple Interface |


1. Open PDF
Go to the "File" menu, find and open the PDF file you desired to add stamps from your local hard drive.
2. Add a stamp in Adobe
Click the "Comment" menu on the top right of the main interface and select the "Add Stamp" tool to choose the stamp you are going to create.
3. Change preference to Stamps
Open the identity dialogue box by going to "Edit" > "Preferences" and select the Identity category on the left.
4. Place the stamp
Place the stamp by dragging it to the PDF page you want to put it.
![]()
Step 1. Open PDF and navigate to the "Comment" menu
Open the PDF document you are going to add stamp. Click the "Stamps" button, and select the stamp type you need. There are three stamps types for your option.
Step 2. Add the stamp to the PDF page
Drag the stamp to the PDF page where you want to locate it. You can click on the sideline and drag it to change the stamp size.
To edit its properties, right-click the stamp and select "Properties" from the drop-down menu to change details for the stamp, including author, subject, color and opacity and more. If you want to add a note for the stamp, double-click it and type in the texts you want.
Step 3. Create custom stamp to PDF
With Wondershare PDFelement, you can create a customized stamp by importing the image-based file in your computer. Go to the "Comment" menu, click the "Create Stamp" button. Choose the "Create Custom Stamp" from the drop-down menu, select an image from your computer and upload it to create a new custom stamp, name it for future use, click "OK" to save it.
To use the newly created stamp, you can find it by clicking the "Stamp" menu. Make modifications to it by double-click on it and drag it to the place where you want to put it.
Still get confused or have more suggestions? Leave your thoughts to Community Center and we will reply within 24 hours.
"Thoughtfully designed and very capable PDF editor."