PDFelement - Edit, Annotate, Fill and Sign PDF Documents

Academics, students, and even our offices nowadays use the Portable Document Format (PDF). As these files are being created some people may not put its size into considerations. Some could be large and take up too much storage space. Large PDF files are also clog when you want to upload them to websites. To make it easier to attach and send files. Therefore there is a need to reduce the file size of your PDF files. In this article you will learn how to compress PDF in Preview on Mac OS X.
| Items |
 
|

|
|---|---|---|
| Flexible Compression Rates |
PDFelement offers different compression rates, you can choose an offered rate according to your needs. |
No compression rate for you to choose. |
| Preview Compression Results |
Preview the file quality before perform compression. |
No preview function available. |
| User-friendly Interface | ||
| Running Speed | ||
| Compatibility |
Work well with Windows, Mac and iOS |


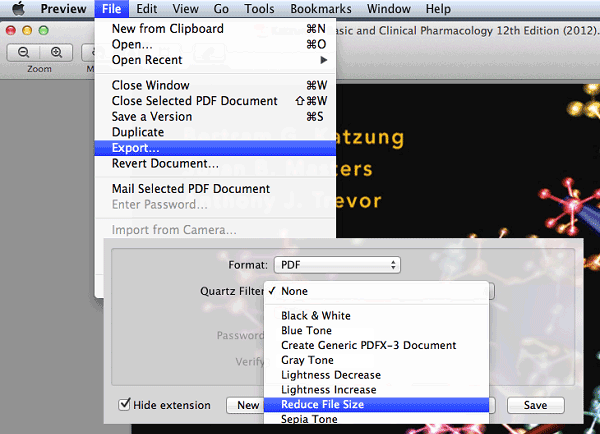
1. Open PDF with Preview on your Mac. Then click on the "File" menu and click "Open" to upload your PDF file.
2. Once the PDF file is on Preview, click on "File" and select "Export".
3. On this window, scroll down and click on "Quartz Filter" and select "Reduce Size file". Then click on "Save". You have compressed your PDF.
![]()
Step 2. Optimize to Reduce File Size
Go to "File" and click on "Optimize PDF" option. There are different compression options. You can choose one to preview the result before compressing it.
Click "Save As" and then the program will then resize your PDF immediately. This software is smart since it displays the original file size and the size of the reduced file. After that click on "Save" to make the changes.
Still get confused or have more suggestions? Leave your thoughts to Community Center and we will reply within 24 hours.
"Thoughtfully designed and very capable PDF editor."