PDFelement - Edit, Annotate, Fill and Sign PDF Documents

JPG or JPEG is the most famous format to store image files on any computer which have been in use for a long time. Sometimes, a PDF file contains a lot of image or consists of a one-page flyer which you want to upload as an image on a social networking site, the easiest way to do that by converting the PDF to JPG on Windows. If you are a fan of Adobe Acrobat, the good news is that the "Adobe PDF Package" will let you save the PDF as an image on your computer with two clicks. However, this feature is only present in Adobe Acrobat DC and you will have to pay $5.84/month to get this feature on any device which seems very costly for most of the people. Here’s a step by step guide on how you can convert PDF to JPG in Adobe Acrobat.
| Items |
 |

|
|---|---|---|
| PDF Conversion |
Convert PDF into a wide range of file formats, including PDF to Word, Excel, PowerPoint, Image (JPG, PNG, GIF, TIFF and BMP), Text, EPUB, HTML, RTF, HWP etc. |
Only supports conversions between PDF and Word, Excel, PowerPoint, RTF, PNG, JPEG, TIFF. |
| Batch Conversion |
Convert a batch of PDFs to high quality JPG images. |
Support batch conversion. |
| Running Speed | ||
| More Info |
Get to Know All Features of PDFelement feature |
Get to Know the Main Differences between PDFelement and Adobe Acrobat |


Step 1. Open PDF with Adobe
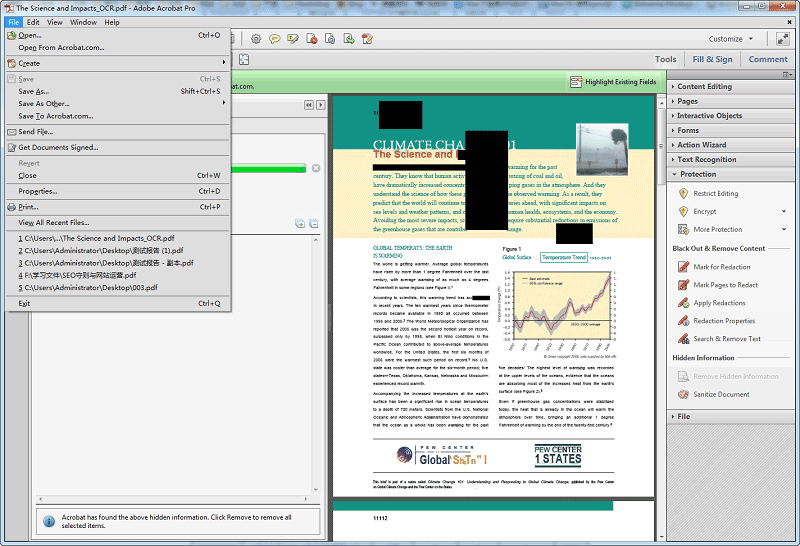
Launch Adobe Acrobat on your computer and drag the PDF file that you want to convert to JPG into the application. An alternative way to open a PDF file in Adobe Acrobat is by clicking on the "File > Open" which will open the browse window on your computer. Select the PDF file and click on the "Open" button again.
Step 2. Go to the File Menu
Once the PDF file is opened in Adobe Acrobat, click on the "File" button in the top bar again and select "Save As Other". On the next tab, click on the "Image" and select either JPEG or JPEG 2000 which is a new format to save JPG images.
Step 3. Save File as JPG
This will open another window on the screen where you can change the "Settings" of the output image file. Here you can save the JPG file as the "Colorful" or "Grayscale" image and can also select the output quality for the JPG file. Finally, click on the "OK" button and the output file will be shown as an image on your computer.
Note: This method will only work with the "Adobe PDF Package" and without this package. You will not see any "Export as Other" button in the program.
![]()
Still get confused or have more suggestions? Leave your thoughts to Community Center and we will reply within 24 hours.