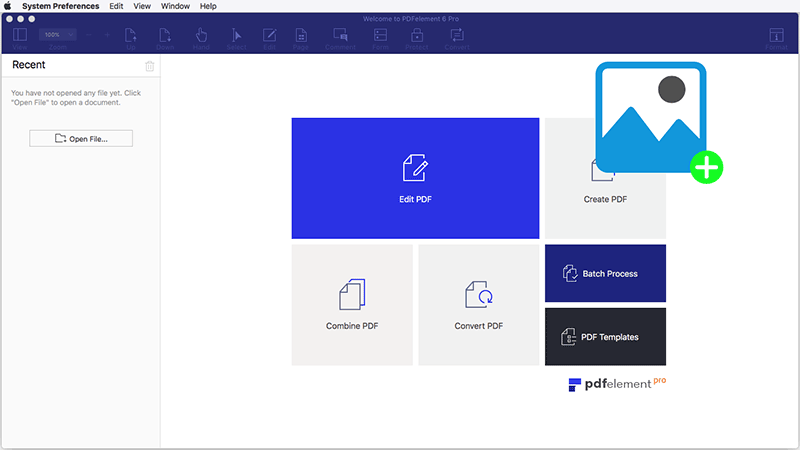
Product Introduction
PDFelement 6 for Mac is a powerful PDF tool that allows you to produce great looking PDF documents and forms quickly, affordably, and securely. With this application, you can:
- Open, save, print and markup PDFs;
- Add, remove, move, re-size and rotate any graphical element within your PDF;
- Secure your PDFs with password protection;
- Convert PDF documents into Word, HTML, text and image files;
- Create interactive form field and recognize form field automatically;
- Extract data from interactive PDF forms and export in CSV format;
- Insert page numbers, bates numbering, and page elements;
- Unlock text within images using OCR;
- Perform partial OCR on specific user-defined fields in scanned PDFs;
- Batch process to convert, data extraction, bates numbering and watermark.
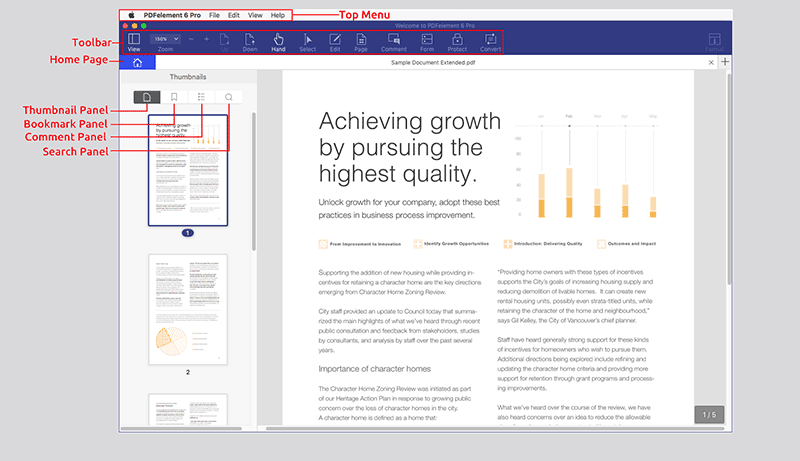
This section will help you orient yourself with the PDFelement 6 for Mac interface.
Download and Install
1System Requirements
To use PDFelement 6 for Mac, your computer is expected to meet certain basic system requirements as follows:
Note: If you are using OS 10.8 or 10.9, please visit the link below to download and install a version compatible with those OS versions.
https://pdf.wondershare.net/pdfelement-mac/tech-spec.html
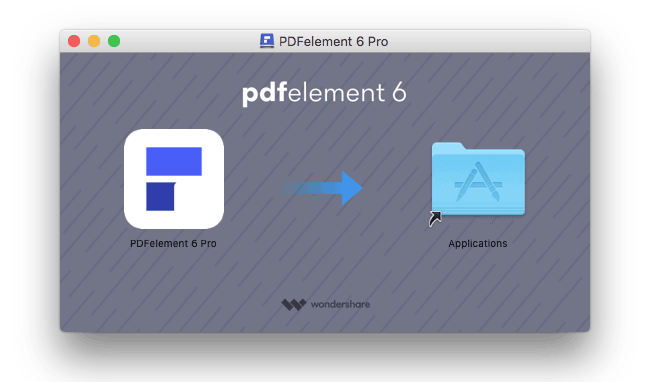
2Download and Install on Mac
-
Visit https://pdf.wondershare.net/pdfelement-mac/ to download the trial version of Wondershare PDFelement 6 for Mac.
-
The downloaded .dmg file will now be found in your Downloads folder. Double-clicking this file will start the installation and it will be sent to your Application folder automatically. When you need to use the program you can just access your Application folder, or from your Launchapd on the taskbar.
Register (Remove Trial Watermark)
1Trial Version Limitations
After downloading and installing, you only get the trial version of PDFelement 6 for Mac. And there are limitations as follows:
- Leaves a watermark on your PDF files when you save after editing or commenting the file. (It is better if you click the "File">"Save As" button on the top menu to save it to a new copy with the watermark, then it wont affect your original PDF.)
- Convert half of your PDF pages only and convert 5 pages at most when your PDF file has more than 10 pages.
- If you use the batch process to extract data, it will process two files only.
- If you use the batch process to add watermark or bates number, it will process all the files you load but will still add the trial watermark in each file.
- The OCR function is not available.
2Purchase PDFelement 6 for Mac
To get the full version of Wondershare PDFelement 6 for Mac, you need to purchase it and get the registration code. Please follow the below steps to purchase PDFelement 6 for Mac:
-
Click the "Buy Now" button in the program, or visit the Official Wondershare store via this link:purchase page .
-
Follow the on-screen instructions to finish the purchase process.
-
Check in the email address that you supplied in your purchase as the information will be sent to you there.
(Note: Sometimes, you may find the registration code email located in the junk/spam mail box.)
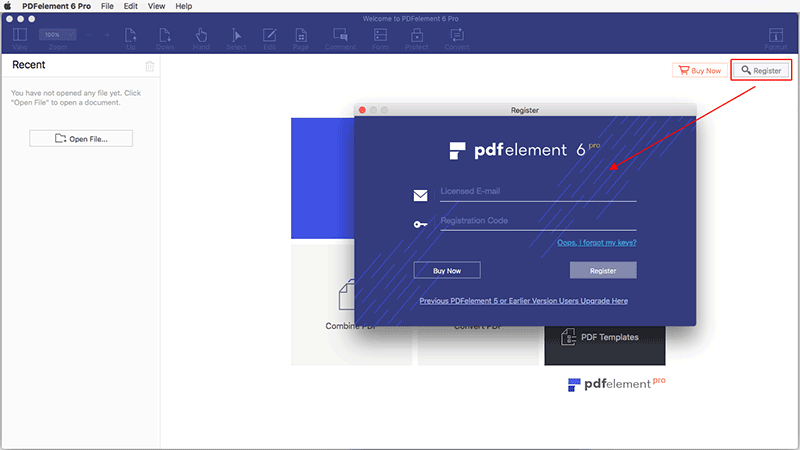
3Register PDFelement 6 for Mac
In order to use the full version, you need to use the registration information that you received to register the free trial version to the full version after purchasing it. Without registration, the product will remain as the free trial version even though you have purchased it. The directions below will allow you to register PDFelement 6 for Mac after you have received your purchased registration.
-
Please go to Application folder to launch PDFelement 6 for Mac, click the "Register" button at the right side of the program window to open the register window.
-
Copy & paste the registration code that you received in your e-mail, click the "Register" button to finish the registration process.
4Remove Trial Watermark
After registration, the registered full version program does not have any limitation to use. If you have any files that you worked on during the trial period that have the trial watermark on them, just reopen them in the registered program PDFelement 6 for Mac, and the watermark will be removed automatically. You can then save a clean copy of the file that you used for testing.
Top Menu
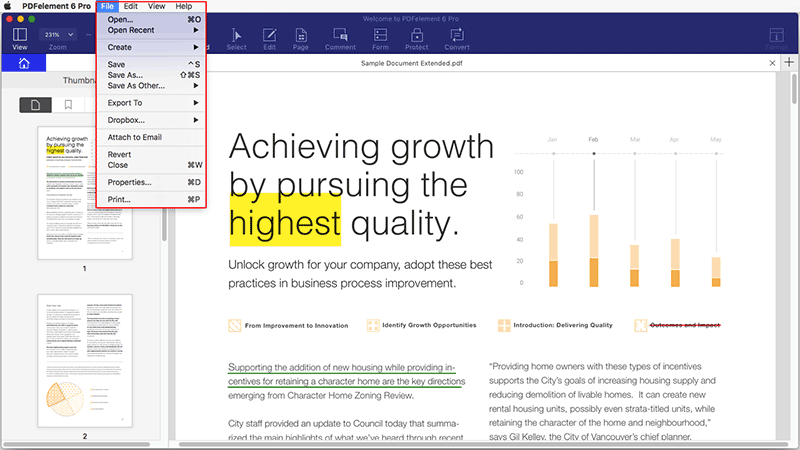
1File Menu
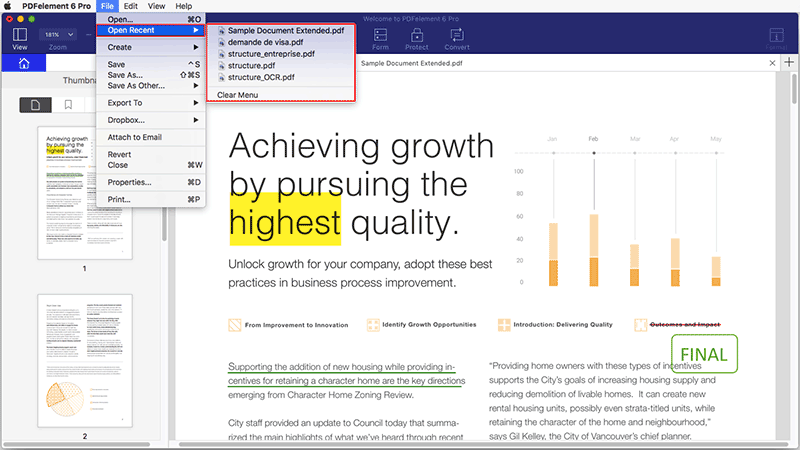
Click the "File" on the top menu, and more options will be available.
-
Open: Open PDF files by browsing local folders or open the recent opened files.
-
Open Recent: Open a PDF file that you have recently opened.
-
Create PDF: Create PDF from multiple options, including create from file, from window capture, from seelction capture, from clipboard, combine files into PDF and blank document.
-
Save: Save PDF documents to destination folder.
-
Save As: Save current PDF document to a new copy in the destination folder you select.
-
Optimize PDF: Reduce the file size to facilitate transferring and saving in local folder.
-
Export To: Convert PDF files to various other format files, such as word, excel, powerpoint, image, epub, txt, pages, html and rtf.
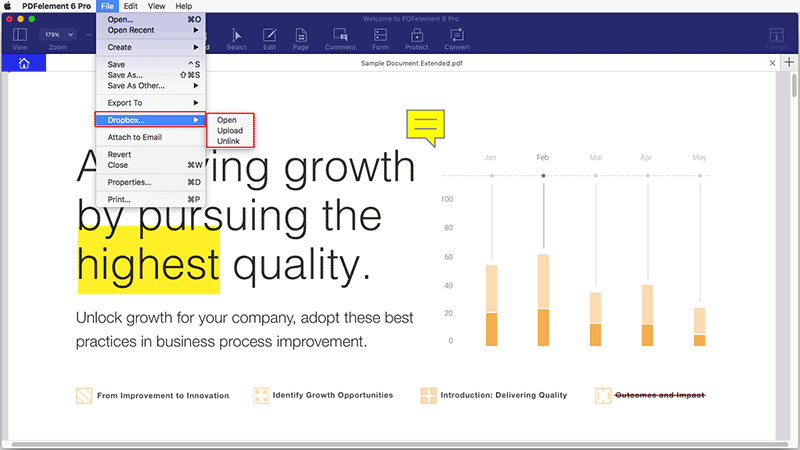
- Dropbox: Open your dropbox account to upload and save PDF files to Dropbox for transferring.
- Attach to Email: Open your default email box and attach the current PDF file to send by email.
- Revert to Saved: Allows you to undo all the modifications that you have done to the current PDF files.
- Close: Close the current PDF document, and go back to the welcome interface.
- Properties: Check the current PDF document descritions, security and initial view.
- Print: Print current PDF to paper documents.
2PDFelement 6 Menu
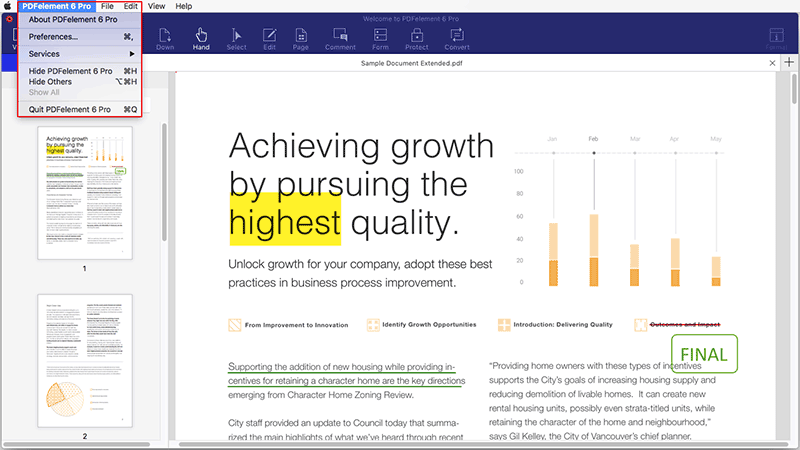
-
About PDFelement 6 : Check the version number of PDFelement 6 for Mac.
- Preferences: Set preference options for PDFelement 6 for Mac, including page display mode, OCR download and updates frequency setting.
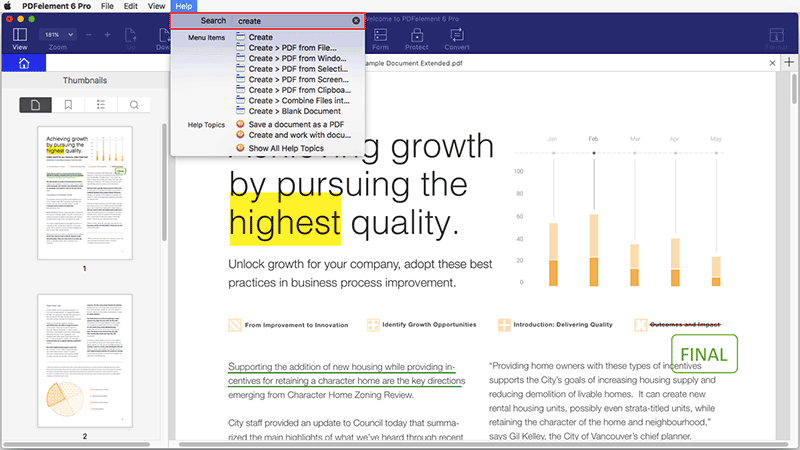
Search Feature
Unsure of which function to select when you are working on your PDF files? Not sure where the right button is? PDFelement 6 for Mac now has a convenient search feature built into the software which will allow you to find the feature you want. The following steps will describe how to use this powerful tool.
-
Click the "Help" on the top menu and you will see the search box.
-
Type a feature or the content you are looking for. If the feature you need is in the top menu, the resulting search will be presented under the search box with the location you need.
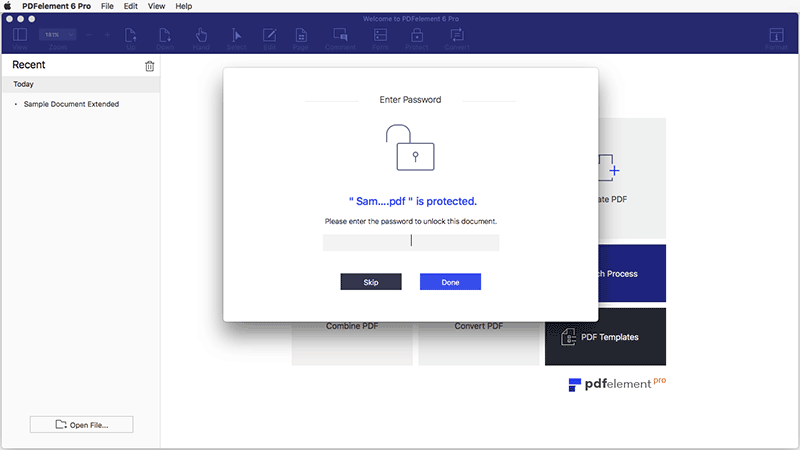
Open a Secured PDF
To ensure the security of data, some PDF's will have a password to protect it. If you have received a PDF that is protected with a password, you just need to entire the correct password to view the file.
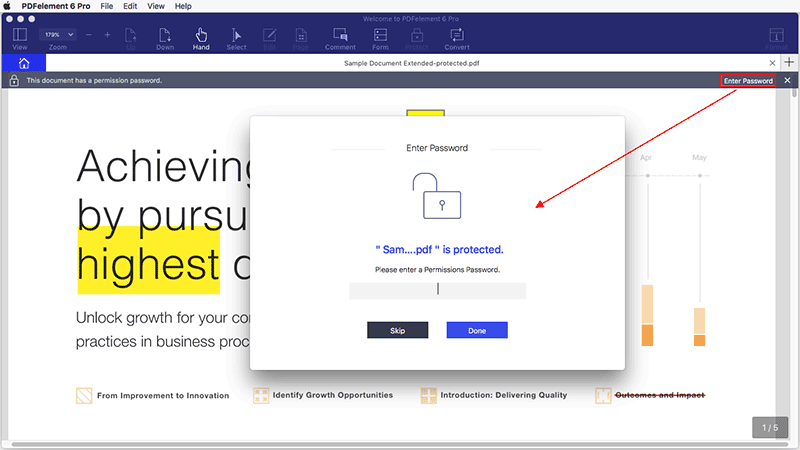
Some protected PDF files have other restrictions to prevent from printing, editing, copying, etc. When you try to print or edit this secured PDF file, you will be notified that the document is password protected. You can click the "Enter Password" button in the red highlighted notice to enter the permission password to enable the ability to edit the document.
Page View Mode
1Document Layout
Viewing and navigating PDF files are very intuitive with PDFelement 6 for Mac. The most common used options will be found in "View">"Page Display" in the top menu.

-
Single Page View: View one page in the document pane at a time.
-
Enable Scrolling: Arrange the pages in the document pane in a continuous vertical column with scrolling enabled.
-
Two Page View: Arrange the pages side by side, displaying only two pages at a time.
-
Two Page Scrolling: Arrange the pages side by side in a continuous vertical column with scrolling enabled.
2Zoom
With the zoom tool, you can enlarge or shrink the view of a PDF to see more details. You can zoom in to a minimum of 1% and zoom out to a maximum of 6400%.
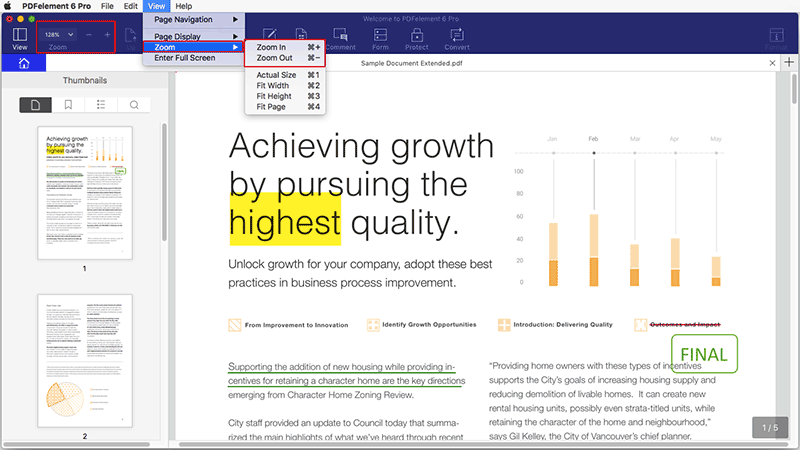
-
Click the "Zoom In" or "Zoom Out" options, and the page will change accordingly.
-
Select a percentage in the Zoom drop down menu and the page will change to the chosen size.
3Page Layout
You can also get the page layout options under "View >Zoom", allowing you to change the layout of the pages in your PDF document, which include "Actual Size", "Fit Width", "Fit Height" and "Fit Visible". The options under "View">"Zoom" allow you to:

-
"Actual Size": To resize the page to its actual size of 100% zoom level.
-
"Fit Width": To resize the page to fit the width of the window. Part of the page may be out of the view.
-
"Fit Height": To resize the page to fit the height of the window. Part of the page may be out of the view.
-
"Fit Page": To resize the page to fit entirely in the document pane.
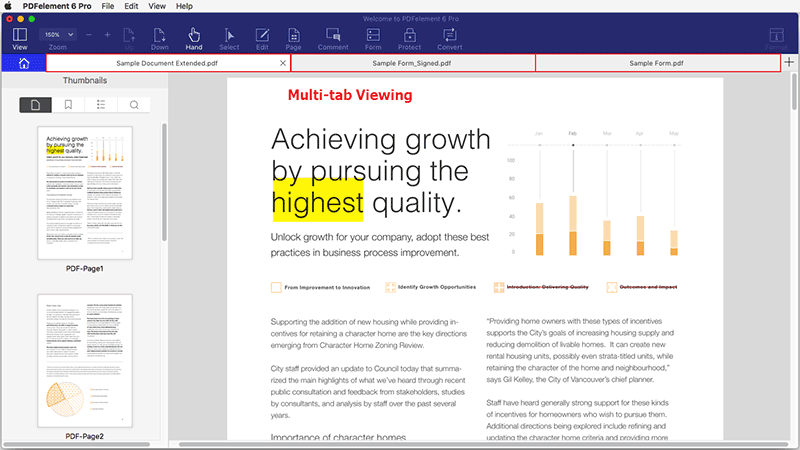
4Multi-tab Viewing
PDFelement 6 for Mac allows you to open as many documents as needed in a single application window, and will arrange them into different tabs in that window for you. This allows you to keep all of your documents readily available to work with, or review as needed.
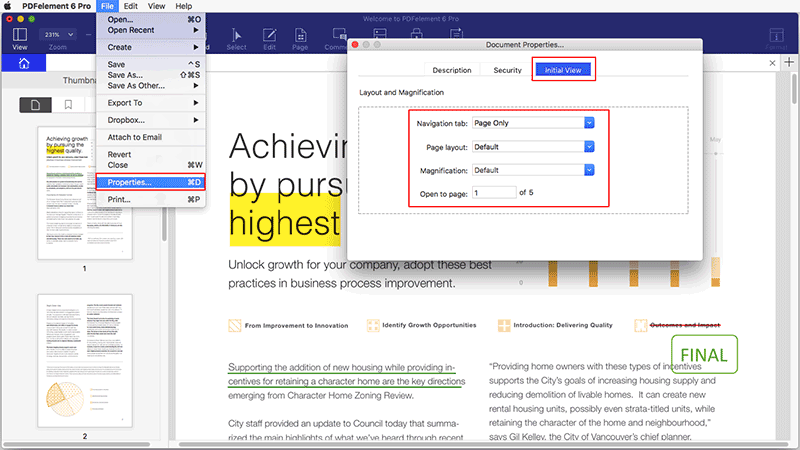
Initial View
For a file that you will be reviewing frequently, it is possible to adjust how it opens every time for you in PDFelement 6 for Mac. To do this, go to "File">"Properties">"Initial View" and change the settings as you prefer. Once you have finalized your settings, click on "File">"Save" or "Save As" to make the changes. Once you have done this, the file will always open with the settings you have chosen.
- Navigation tab:You can set whether to open the bookmark pane and thumbnail pane automatically when you open this document to view
- Page layout: You can set the layout mode to view this document.
- Magnification: You can set the view mode for this document.
- Open To Page: You can set the open page for this document. For example, if you set to open page 2, then it will open page 2 automatically when you open this document every time.
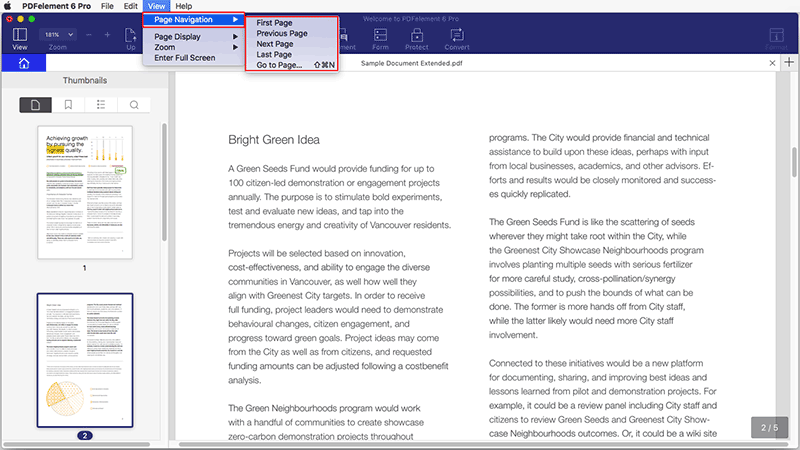
Page Navigation
You can navigate through the pages of your current active document using the navigation buttons in the Toolbar:
-
Click the "Up" button to go to the previous page of the current file. Or you can go to the "View" tab, click "Page Navigation" and choose "Previous Page".
-
Hit the "Down" button to jump to the next page. Alternatively, you can choose "Next Page" from the "Page Navigation" menu under the "View" tab.
-
Go to the "View" >"Go to Page" button on the top menu, enter the page number and press the "OK" button to jump to the destination page.
-
Go to the "View">"Page Navigation" on the top menu, click the "First Page" button to navigate to the first page of the current file. To move to the last page, click the "Last Page" button.
Navigation Panel
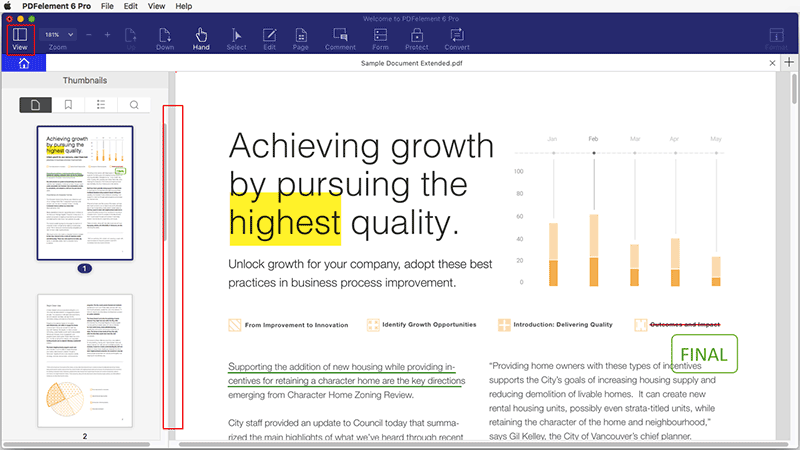
1Display and Adjust Navigation Panel
Once a PDF document has been opened in the software you can bring up the extra toolbars by clicking the "View" button in the toolbar. Here you can display the Thumbnail Panel, Bookmark Panel, Comment Panel, and Search Panel. Once they are open, you can click and hold on the edges to adjust the size of the panels as needed. If you click on "View" again, it will hide the panels from view until needed again.
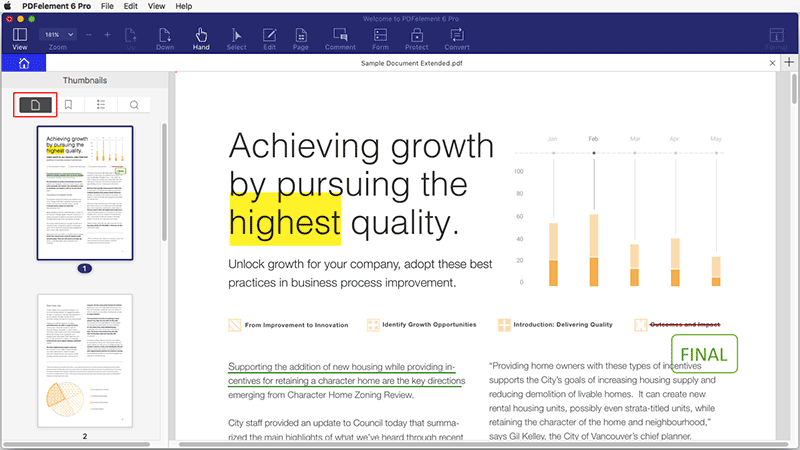
2Thumbnail Panel
The Thumbnail Pane allows you to quickly scroll through pages in your document using the mouse wheel, or by dragging the slider in the pane.
-
Resize the panel: If you click and hold on the right edge of the panel, you can resize the panel as needed. If there is enough space, you can display two pages of thumbnails in one panel per row.
-
Organize the page order: By dragging the thumbnails in the "Thumbnail Pane" you can reset the order for your pages as you need.
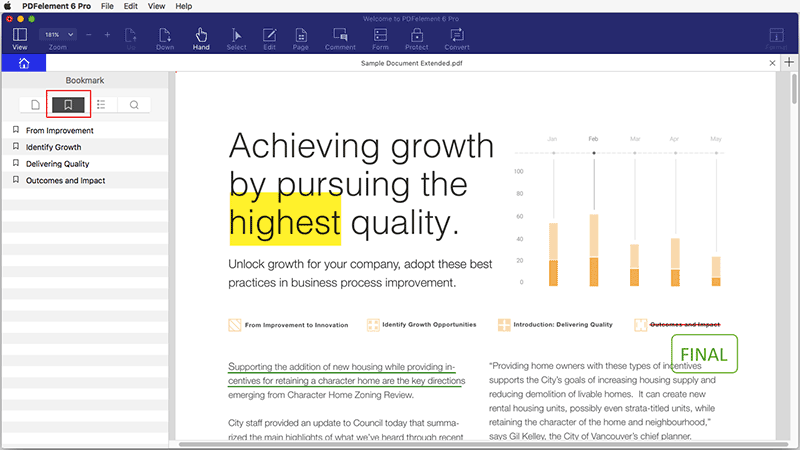
3Bookmark Panel
A bookmark is a link to specific text within a document. Use the bookmarks to go to different pages in the document. PDFelement 6 for Mac allows you to navigate through the bookmarks by simply going to the Bookmark panel and click on the bookmark of your choice to jump to that location. If you want to create bookmarks, you can control-click the blank space in the comment pane, and choose "Add Entry", then you can rename the bookmark.
If your PDF file has bookmarks, it will open the bookmark pane by default. Under the "PDFelement 6">"Preferences" option on the top menu, you are able to set the "Default View" as you need it in the "General" tab.
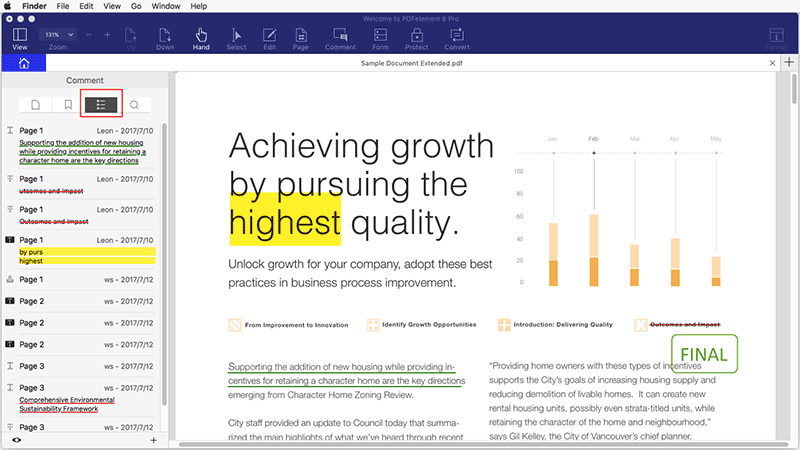
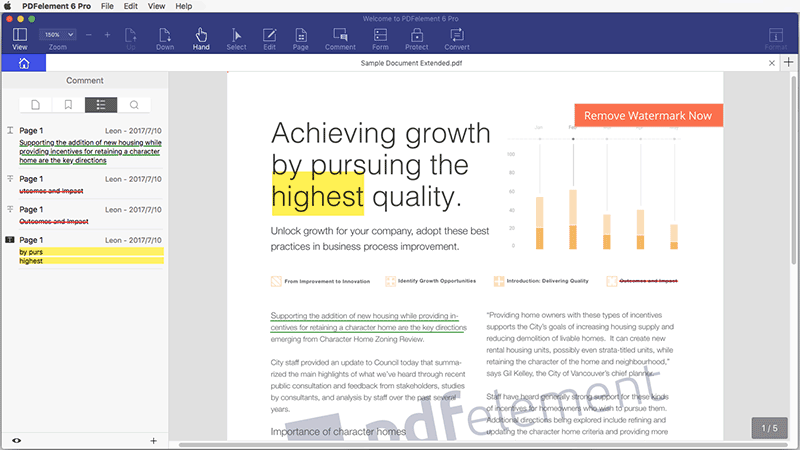
4Comment Panel
The Comment Panel allows you to find all of the comments that you have added to a PDF file. If you need to delete a comment just click on the comment in the pane, and then press the Delete key on your keyboard. Clicking on the comment will also allow you to see the properties relating to that comment on the right side pane, allowing you to make changes as needed.
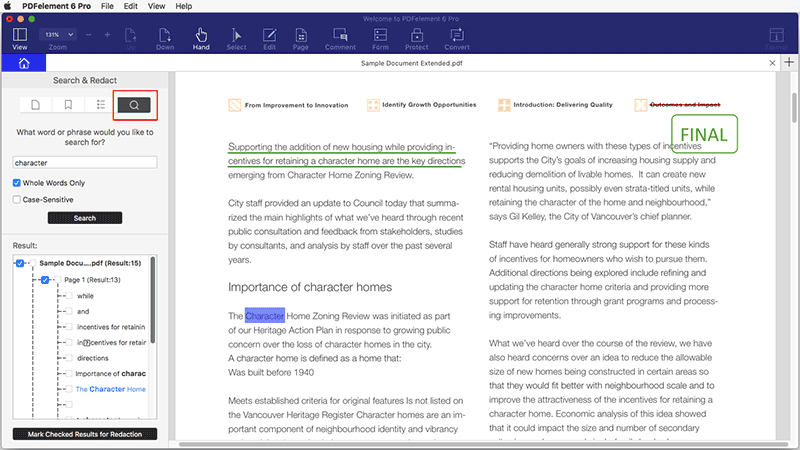
5Search Panel
Pressing Command+F on the keyboard is a shortcut key to opening the Search box, allowing you to enter keywords to search in the document. Once you enter the search parameters and press the Return key, those results will be highlighted.
One-Click PDF Creation from Files
PDFelement 6 for Mac is able to create the following formatted files (.html, .htm, .webarchive, .gif, .tiff, .jpg, .jpeg, .bmp, .png, .txt, .rtf, .rtfd) to PDF files. The following methods will enable you to be able to create the formats that you need.
-
PDFelement 6 supports to create these formats files
-
Drag the document you want to convert on to the PDFelement 6 for Mac icon in the Dock.
-
If the PDFelement 6 for Mac is open, drag the file directly into the product window.
-
The file will be opened in PDFelement 6 for Mac, and you can click the "File">"Save" button on the top menu to save to a PDF file on your Mac.
Creation in PDFelement 6 for Mac Window
1Create a PDF from a File
You can create a PDF from image files, web files and text files. Here are two ways to create:
-
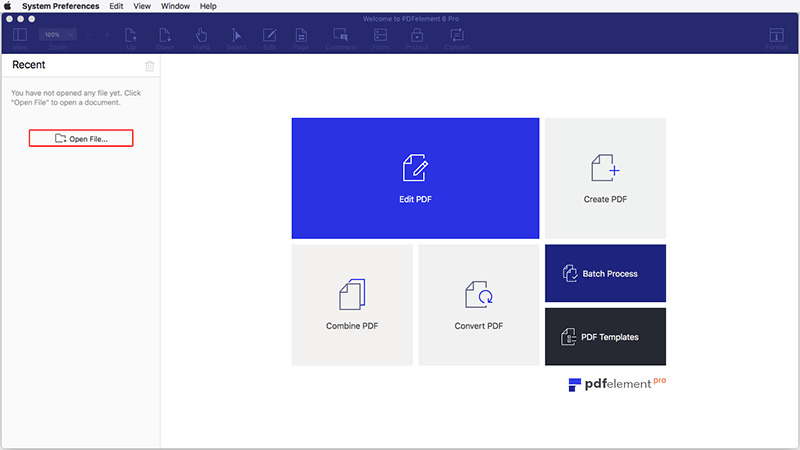
Launch PDFelement 6 for Mac, and click the "Create PDF" box in the welcome window. Select your file from a local folder to "Open". The created PDF file will be opened in PDFelement 6 for Mac automatically, now click the "File" > "Save" button or press the "Command + S" keys to save it, where you can also rename and choose the output destination folder that you need the file to reside in.

-
Alternatively, you can click "File">"Create">"PDF from File" or simply use the combo "Command+ N" keys. Open the file by browsing to a local folder, then make your modification once the file has opened in PDFelement for Mac, then click "Save" to save it into your preferred destination folder.
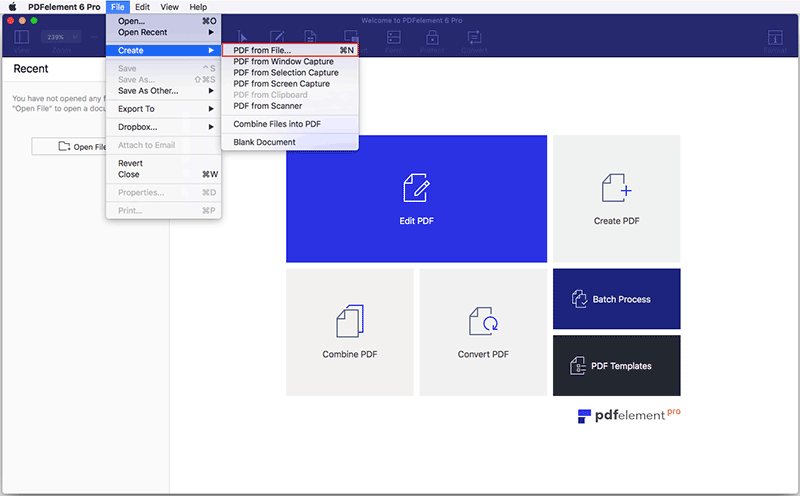
-
Navigate the file you would like to create to PDF in the popup window and click "Open".
Note: If you select multiple files to create, it will open each file in a separate tab so that you can save each as a separate PDF file.
2Create a PDF from Capture
PDFelement 6 for Mac supports creation of a new PDF file from different capture options.

-
PDF from Window Capture: Create PDF from any window that you have opened on the desktop.
-
PDF from Selection Capture: Use selection tools to create a PDF from an area that is defined by you.
-
PDF from Screen Capture: Create a PDF using the full screen information.
-
PDF from Clipboard: Make a PDF from the file that you have pasted to your clipboard.
3Create a PDF from Multiple Files
Besides creating PDFs from a single file, we can also create PDFs from multiple files in other formats. This includes PDF (.pdf), web files(.html, .htm, .webarchive), text files(.txt, .rtf, .rtfd) and images files (.jpg, .png, .gif, .bmp, .tiff) using PDFelement 6 for Mac .

-
Click "File" > "Create" > "Combine Files into PDF" or choose "Combine File" box in the welcome window.
-
In the popup window, click "Add Files" to add multiple files you want to combine. You can choose the preferred size in the "Options" button, or you can even customize it.
-
After all the files have loaded, click "Combine" to start combining all of the files.
-
Rename the combined PDF, select the output folder and then click "Save" to save it.
-
The combined PDF will open automatically in PDFelement 6 for Mac allowing you to view or edit it as needed.
4Create a Blank PDF
PDFelement 6 for Mac also has the ability to create a fresh blank PDF that can be filled with any content, such as text, images, forms, comments, or other options as are needed.
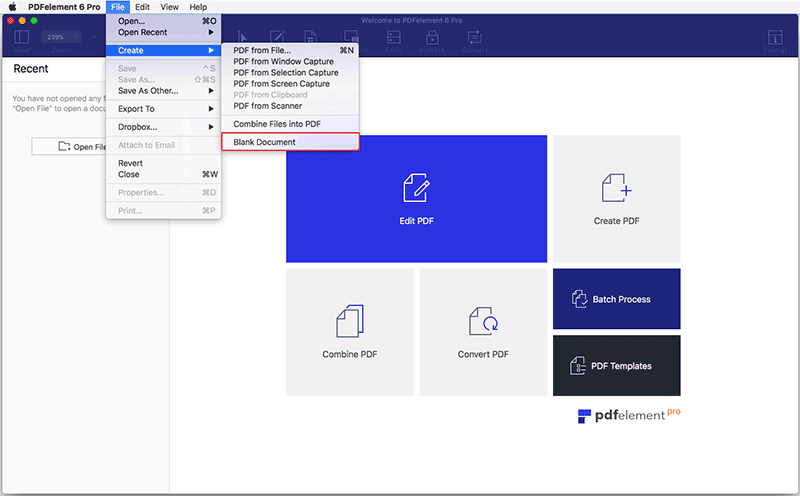
-
Click "File">"Create">"Blank Document" on the top menu.
-
Rename the file and choose the output folder you like.
-
Click "Save" to save the PDF file which will also open a copy in the program to allow you to start editing as needed right away.
Edit Texts
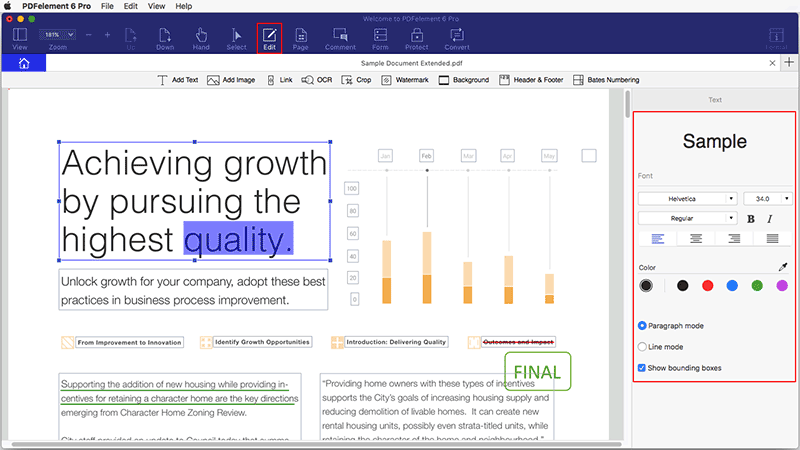
With PDFelement 6 for Mac, you can edit texts in a paragraph as well as changing their font, font size and color. To edit texts in a paragraph, please do the following:
-
Select the "Edit" button, then click the desired text, and the cursor will appear in the text box allowing you to enter new text, and change what you already have.
-
You can choose "Paragraph mode" or "Line mode" at the right side panel to edit.
-
Choose the font, size, layout and color, etc as you need for the text or paragraph.
Note: If you experience a failure in editing the PDF, you may need to run it through the OCR process before editing is possible. If this is the case, you will see an orange highlighted notice informing you that it needs to have this operation run on the file. Please refer to the chapter of
"Perform OCR for A Single Scanned PDF" for more instructions on how to perform OCR before editing a scanned PDF file.
Add Text to PDF
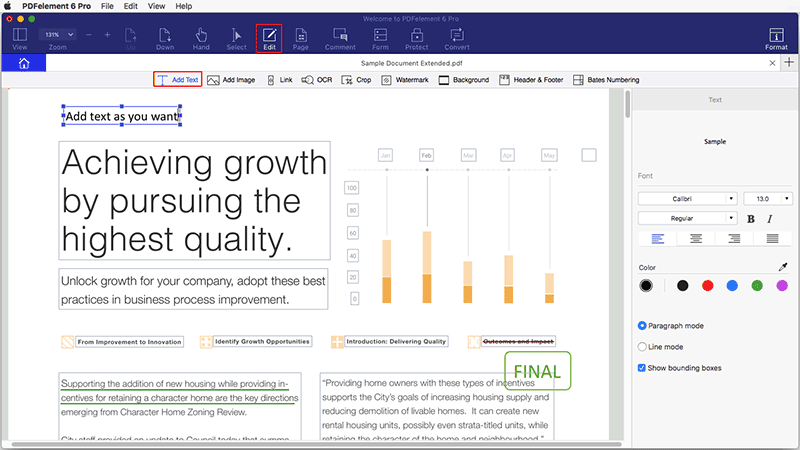
-
After clicking the "Edit" button, click the "Add Text" tool to insert new text into the existing PDF document.
-
Click the page where you wish to place the new text. A blue input box will appear for adding text.
-
Select the font, size, layout and color, etc as you want for the text or paragraph.
Edit Images
Along with editing PDF text, PDFelement 6 for Mac supports basic editing of images for use in a PDF document.
1Add Image
Images can be added into the PDF page to add color to it. The following image formats are supported: jpg, jpeg, bmp, png, tiff, tif. To add image to the PDF page, you need to:
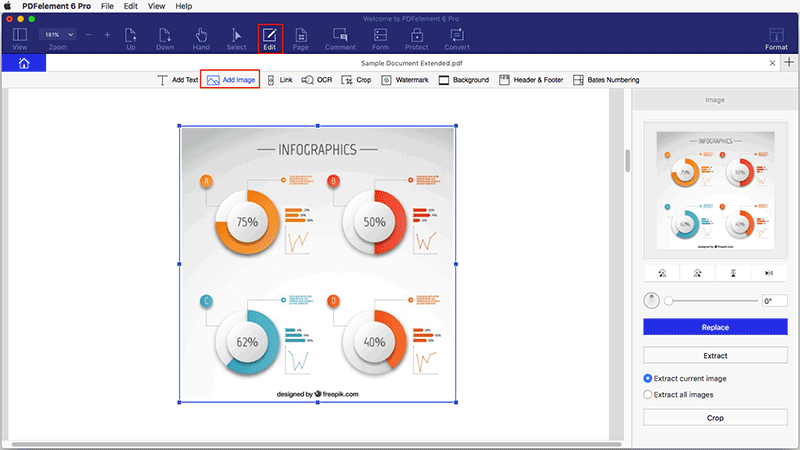
-
Click the "Edit" button in the toolbar, and then click the "Add Image" button on the submenu.
-
Select the image from your computer insert directly.
-
Click and hold on one of the eight small blue boxes on the edge to resize as needed.
-
To move the image as needed, click and drag the image to the location required. Using the arrow keys on the keyboard will allow for precise movements of the images.
2Delete Image
To delete an existing image, you can click the "Edit" button in the toolbar, select image and then press the "Delete" key on your keyboard.
3 Rotate/Replace/Extract/Crop Image
-
Hit the "Edit" button to start editing mode, then click the target image.
-
On the right side panel, you can rotate the image, replace, extract or crop it.
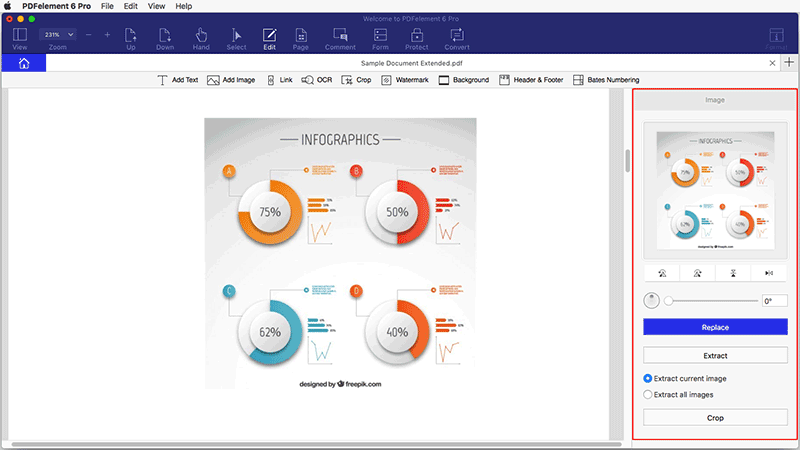
-
Rotate: Change the orientation of the selected image.
-
Replace: Select a new image as substitution to the target one.
-
Extract: Take the target image out from the current PDF.
-
Crop: Adjust the image to only show the important aspects for the document.
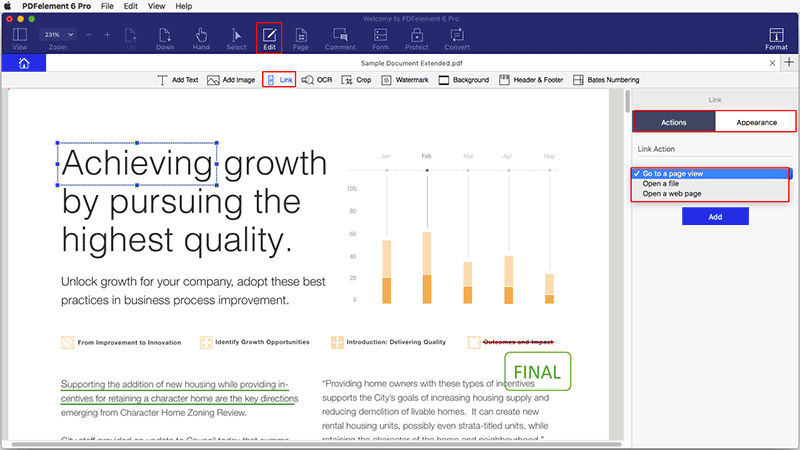
Link
Much like hyperlinks on the internet, using a "Link" in PDFelement 6 for Mac will allow you to jump to specific PDF file, any page in the same file or to a website. This allows for ease of accessing important data and information in the document, and also to cite sources.
1Add Link
-
Go to the toolbar and choose the "Comment" icon, click the "Link" button below it.
-
Click on the location in the document that you wish to place the link.
-
On the right side panel, please click the box below the Actions tab to choose the correct action you want: To Page, Open File or To Web.
Go to a page view: After choosing this option, please click the "Edit" button below it, then you will get a message window, just scroll to the correct page, then click the "Set Link" button in the message to set. Open a file: After choosing this option, please click the "Edit" button below it to browse a file on your Mac.
Open a web page: After choosing this option, please enter the website link in the "http://" box below it.
-
Click the "Appearance" tab to set the Link Type, Link Style, Highlight Style, Line Thickness and Color as you want for the link you create.
2Edit/Delete Link
To edit the link properties, you can click the "Edit">"Link" button in the toolbar and click the link box, you will get the properties panel on the right side. After selecting the link box, you can press the Delete key to delete.
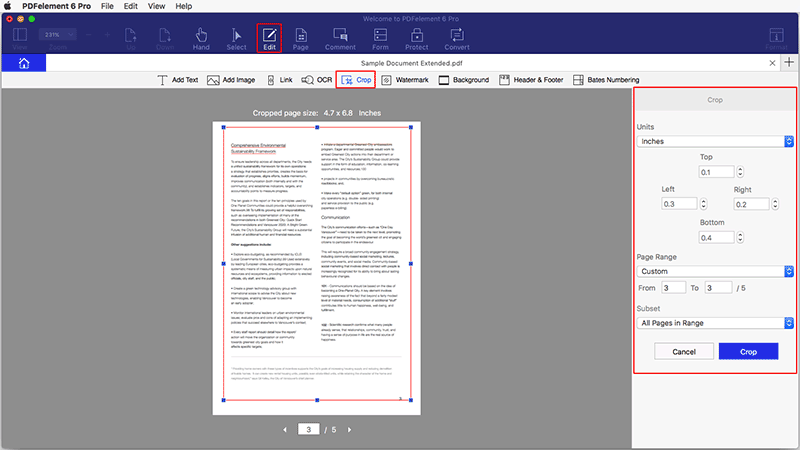
Crop PDF Pages
-
Click "Edit">"Crop" button in the ribbon.
-
On the cropping page popup window, you can either drag the red box to select the cropping area or manually input the desired size in the source options, which you can determine the units of measurement you wish to use. The area you choose in the red box will remain, other parts will be deleted automatically.
-
You will get a red box around the page. Drag the eight small blue squares to resize the red box. The content inside the red box will be kept.
-
You can also set more specific parameters about the margin on the right side panel, then set the page range as you want.
-
Clicking the "Crop" button on the crop panel will finalize the crop and the page will update for you automatically.
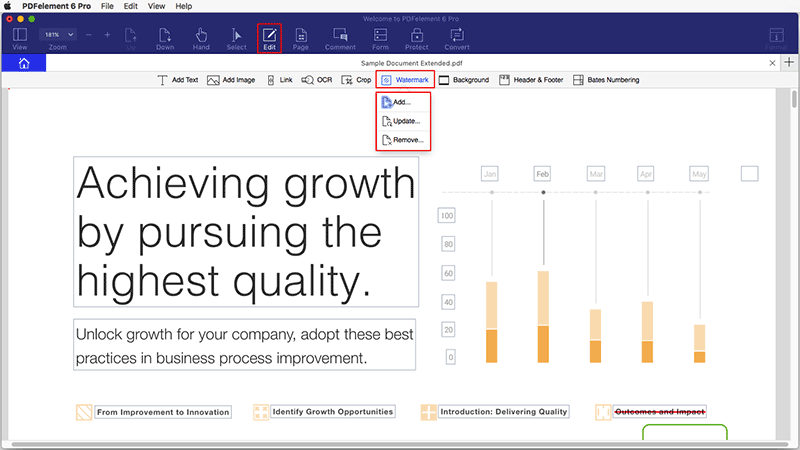
PDF Watermarks
Adding watermarks to PDF pages is a great way to declare our ownership, and we can easily add/update/remove watermarks on PDF pages with the help of PDFelement 6 for Mac.
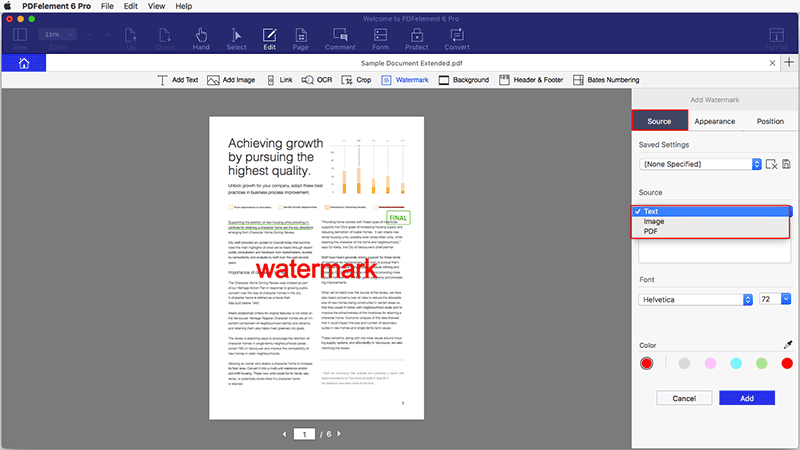
1Add Watermark to a Single PDF
-
After opening a PDF file in the program, click the "Edit">"Watermark">"Add" button.
-
On the right side panel, choose "Text", "Image" or "PDF" in the box of "Source" to add watermark.
Text: Enter the text in the box below as the watermark. Adjust the font type, size and color for it.
Image: Click the "Choose..." button below it to select an image on your Mac as the watermark.
PDF: Click the "Choose..." button below it to select a PDF file, enter the page number in teh box below to select a specific page as watermark.
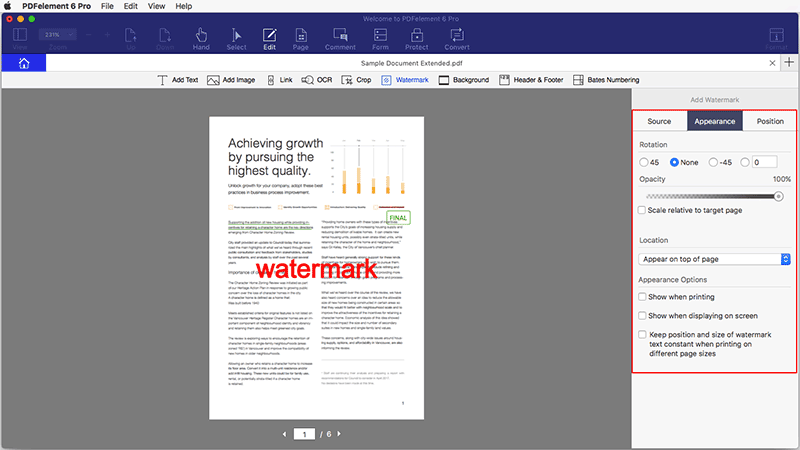
-
Click the "Appearance" tab to choose the rotation, opacity, location and more other options.
-
Click the "Position" tab to choose the position, page range and other parameters as you want.
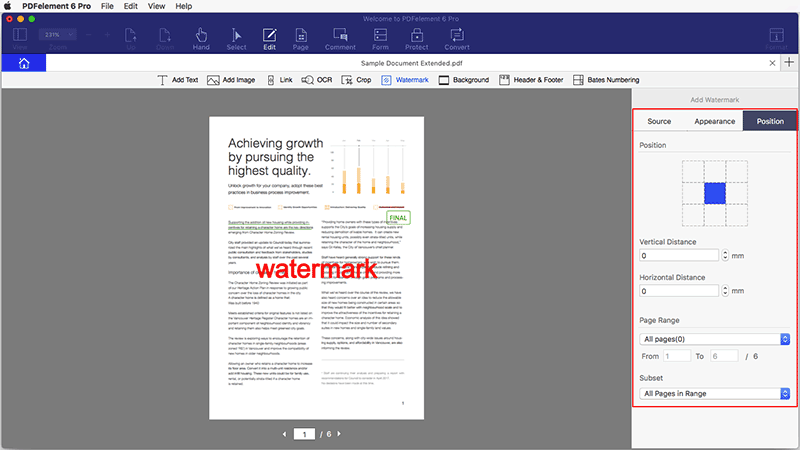
-
After all the settings, you can preview how the watermark displays on the pages, click the "Add" button in the "Source" tab to apply the watermark when you think it's OK.
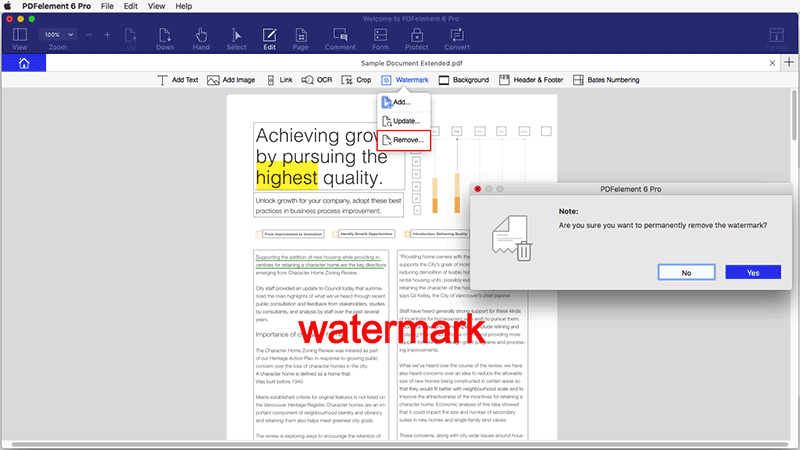
2Delete Watermark on PDF Pages
-
Go to the "Edit">"Watermark">"Remove" button in the toolbar.
-
Click "Yes" in the popup window, then on the right side panel, please click the "Cancel" button to remove the watermark.
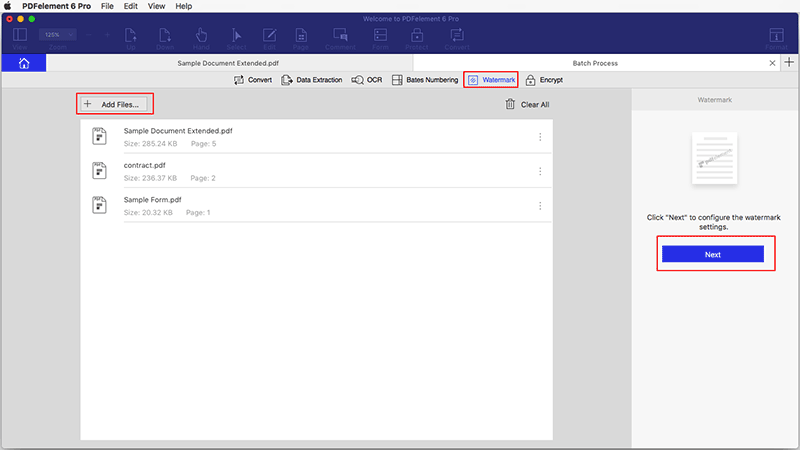
3Batch Watermark Process (Only available in PDFelement 6 Professional for Mac version)
-
After opening the program, click the "Batch Process" box in the welcome window.
-
Click the "Watermark">"Add" button, then load multiple PDF files in the program through drag and drop, or choosing the files from the finder.
-
Click the "Next" button, which will bring up the watermark window that will allow you to use the same steps as used to add a watermark to a single PDF file.
-
Then select the output folder to save the output files.
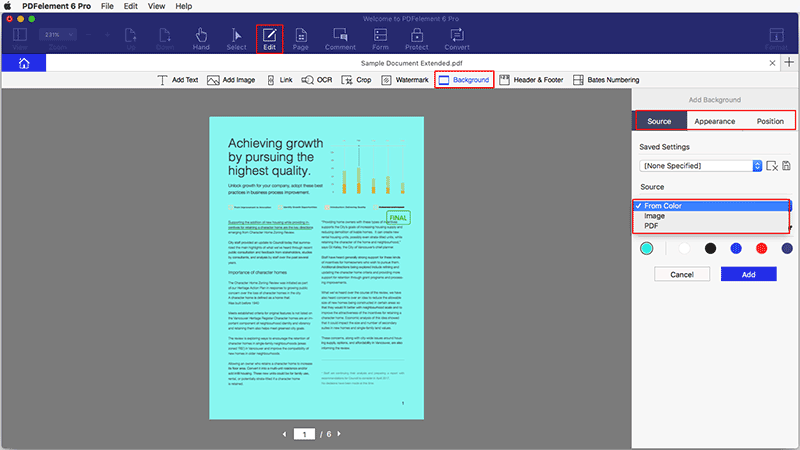
PDF Background
The Background function in PDFelement 6 for Mac allows you to set a color for the background, or import an image to make your PDF pages more attractive to your audience.
1Add Background to PDF Pages
-
Go to the "Edit">"Background">"Add" button in the toolbar.
-
Select the "From Color", "Image" or "PDF" in the option of "Source" box.
From Color: Choose the color as you wish from the ones listed, or use the color wheel to define your own color option.
Image: Click the "Choose..." button below it to select an image on your Mac to add as background.
PDF: Click the "Choose..." button below it to select a PDF on your Mac, set the specific page as the background.
-
In the "Appearance" tab, you can set "Rotation", "Opacity" and other options as you need.
-
In the "Position" tab, please select the "Position", "Page Range" and other settings as you need.
-
Click the "Add" button in the "Source" tab to add.
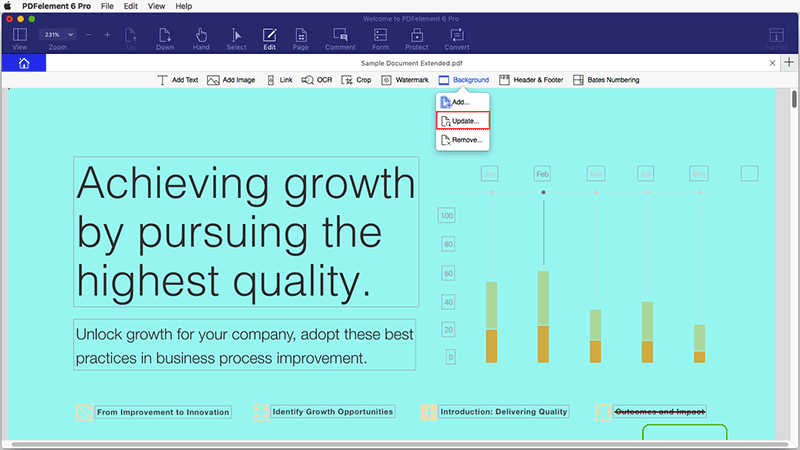
2Update Background
-
Click the "Update" button under the "Edit">"Background" menu.
-
Choose "Replace Existing" or "Add New" option, then set the background again.
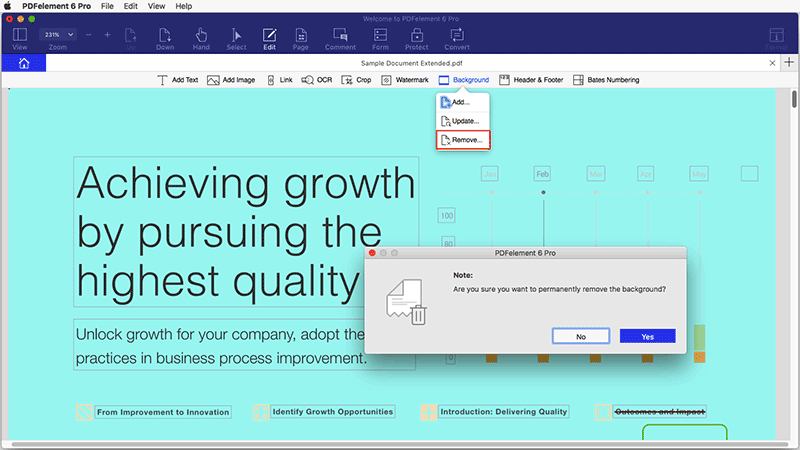
3Remove Background
To remove the background, click the "Edit">"Background">"Remove" button to erase the background. In the pop up message, please click the "Yes" button, then click the "Cancel" button on the right side panel to remove it.
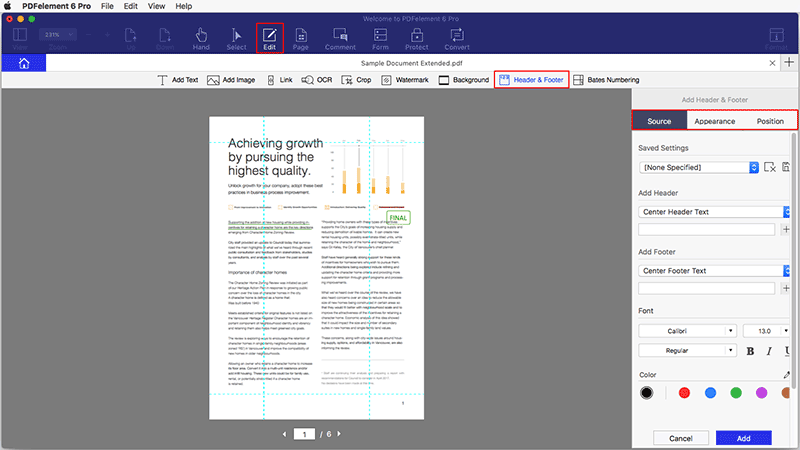
PDF Header & Footer
The headers and footers tool allows you to add specific illustrations as date, origin and page number to your PDF pages and makes the pages formal and professional. Wondershare PDFelement 6 for Mac supports adding the headers and footers to your PDF files easily with just a few simple clicks.
1Add Headers & Footers
-
Please go to "Edit">"Header & Footer">"Add" button in the toolbar.
-
Select the "Header" and "Footer" options, set the font and color as you need.
-
In the "Appearance" tab, choose your preferred date format and page number format. Enter or select the valid value for Start Page Number.
-
In the "Position" tab, you are able to customer the margins to make the headers and footers appear properly in your PDF pages.
-
After setting what you need, click the "Add" button in the "Source" tab to add.
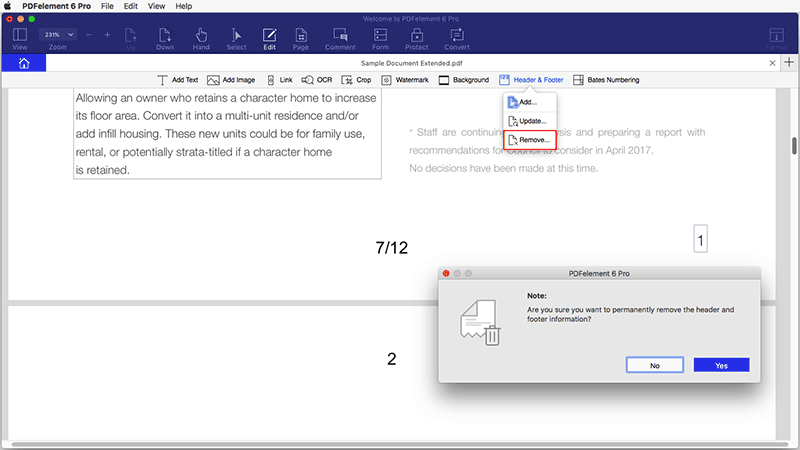
2Delete Header & Footer
-
Go to the "Edit">"Header & Footer">"Remove" button in the toolbar.
-
Click "Yes" in the popup window, then the you can update its settings on the right side panel again or click the "Cancel" button to remove the header & footer.
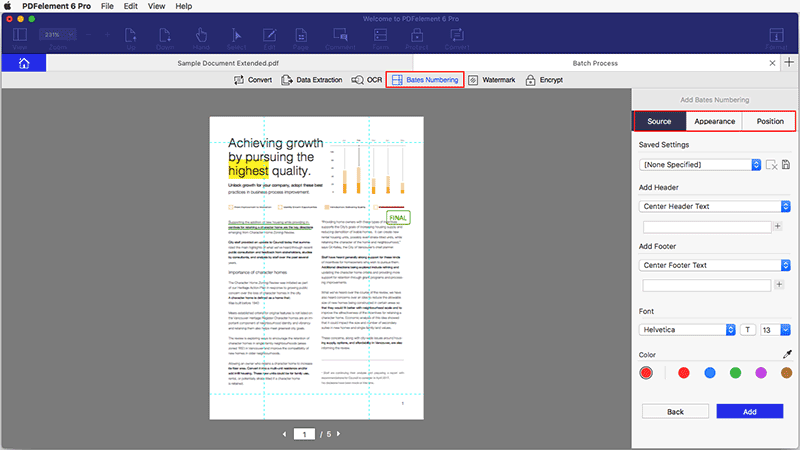
PDF Bates Numbering
(Only available in PDFelement 6 Professional for Mac version)
Bates numbering is a useful PDF tool for lawyers as it can help label and account for the PDF page by creating a unique number for it. The Bates Numbering function from Wondershare PDFelement 6 for Mac allows you to add Bates Numbers to the pages easily and quickly.
1Add Bates Numbering to A Single PDF
-
Please go to "Edit">"Bates Numbering">"Add" button.
-
On the opened right side panel, you can click the "Next" button.
-
In the "Header" and "Footer" option, please choose the "+" button to select the "Insert Bates Number" option.
-
In the pop up window, set the specific number as you need.
-
In the "Appearance" and "Position" tabs, please set the appearance, margin, page range as you need.
-
Click the "Add" button, choose the output folder to save the file and complete the process.
2Remove Bates Numbering
After opening a PDF file with bates numbering in the program, please click the "Edit">"Bates Numbering">"Remove" button. In the pop up window, please click the "Yes" to remove it permanently.
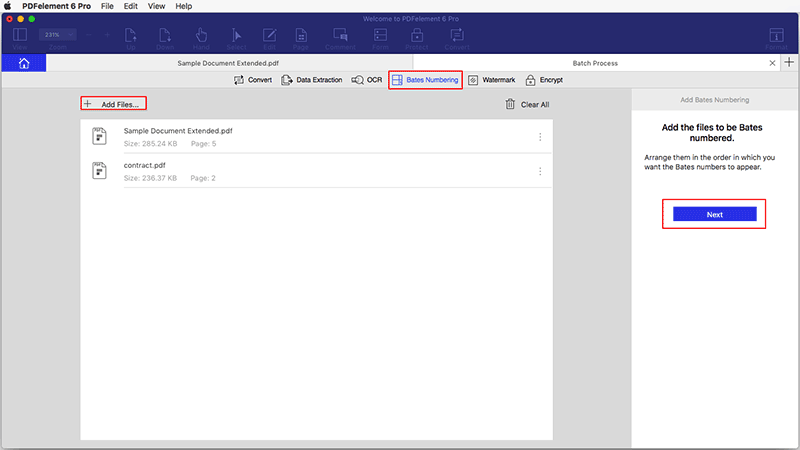
3Add Bates Number for Batch
If you want to add the same bates number for multiple PDF files at the same time, you can use the batch proess.
-
After opening the program, please click the "Batch Process" box, then load multiple PDFs to perform the action on.
-
Click the "Next" button, add the settings as you want. It is the same as how to add bates number for a single PDF.
-
Click the "Add" button, add choose the output folder to save these new PDFs with bates numbering.
What is OCR
(Only available in PDFelement 6 Professional for Mac version)
OCR stands for Optical Character Recognition, which enables images or printed text to be translated into machine-readable text. OCR is must commonly used when scanning paper documents to create electronic copies, but can also be performed on existing electronic documents (eg. PDF). In order to edit the scanned PDF files or image-based PDF files directly or convert them to the editable other format files (like word, excel and ppt .etc) you need to perform OCR first before editing or converting it.
Note: OCR function is embedded in the product PDFelement 6 Pro for Mac, it does not need to purchased separately.
Download/Install OCR
(Only available in PDFelement 6 Professional for Mac version)
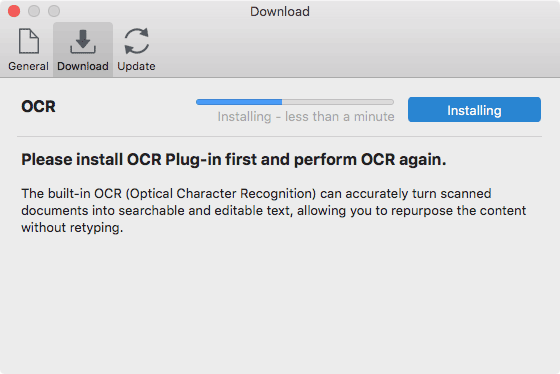
OCR needs to be installed separately. After registering the product PDFelement 6 Pro for Mac to the full version, please click the "Edit">"OCR" button to open the OCR downloading window.
After downloading OCR successfully, click the "OCR" button or the "Perform OCR" button again to perform it.
Perform OCR for A Single Scanned PDF
(Only available in PDFelement 6 Professional for Mac version)
If you experience a failure to edit the PDF text after clicking the "Edit" button, or if the converted word file is non-editable, it would mean that the file requires the use of the OCR function. If the file does require the OCR process to make it editable, you will see an orange highlight notice in PDFelement 6 Pro for Mac, to remind you to run it through the OCR.
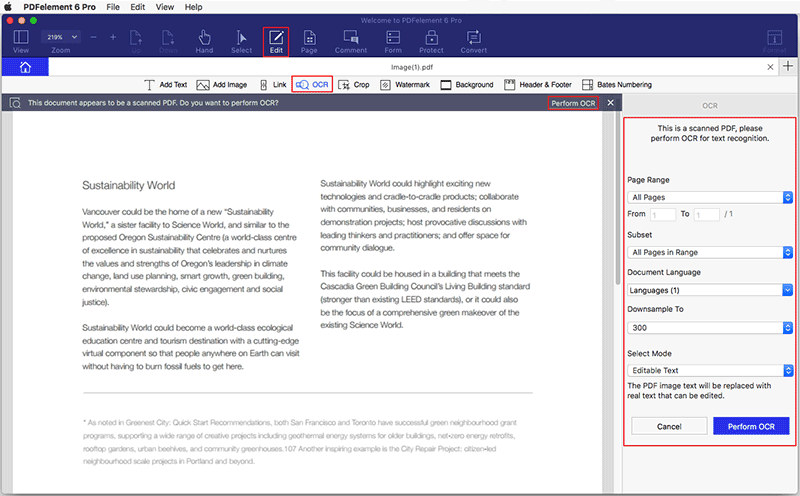
-
Click the "Perform OCR" button in the grey notice or click the "Edit">"OCR" button in the toolbar, the "Recognzie Text" dialog window will pop up.
-
Select the "Page Range" that you want to perform OCR, select the correct language of your PDF content in the "Document Language" otion, and you can also select the DPI as you need in the "Downsample To" option. Click the "Perform OCR" button to execute the feature.
-
After performing OCR, the newly created PDF file will be opened in a new tab in the program automatically. You can click the "Edit" button to edit the text, check the chapter of Edit Text for more information. Another option is to click the "Convert" button to convert it to other formats, check the chapter of Convert PDF for more information.
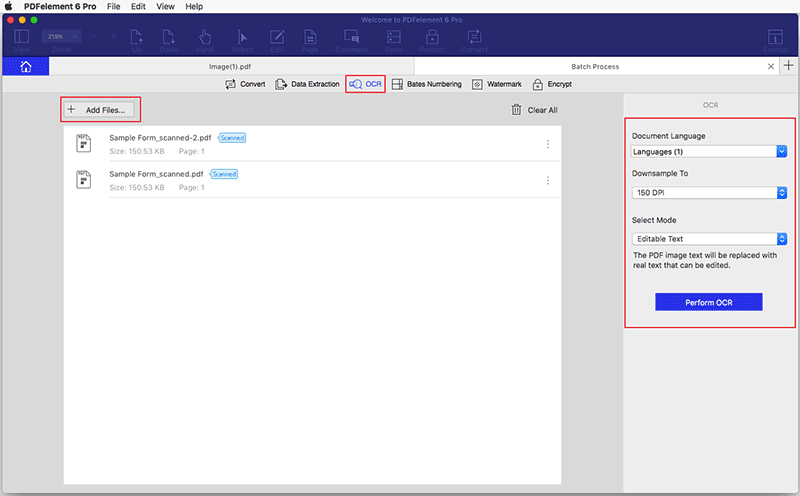
Batch OCR for Multiple Scanned PDFs
(Only available in PDFelement 6 Professional for Mac version)
The latest version program supports batch OCR for multiple scanned PDFs, please do the following:
-
Click the "Batch Process" box in the welcome window, then click the "OCR" button.
-
Load multiple scanned PDF files or image-based PDF files into this window.
-
Click the "Document Language" box on the right side panel to select the correct language of the PDF content in the OCR language list. You can also choose the "DPI" for your files.
-
Click the "Perform OCR" button, then select the output folder where you want to save the newly created PDF files.
-
After performing OCR, the output folder that you selected will be opened automatically, and you will find the new PDFs saved in it.
Organize Page
There are cases that you need to rearrange the PDF pages, like deleting, inserting and extracting pages. PDFelement for Mac gives you the ability to do all these options concerning PDF pages.
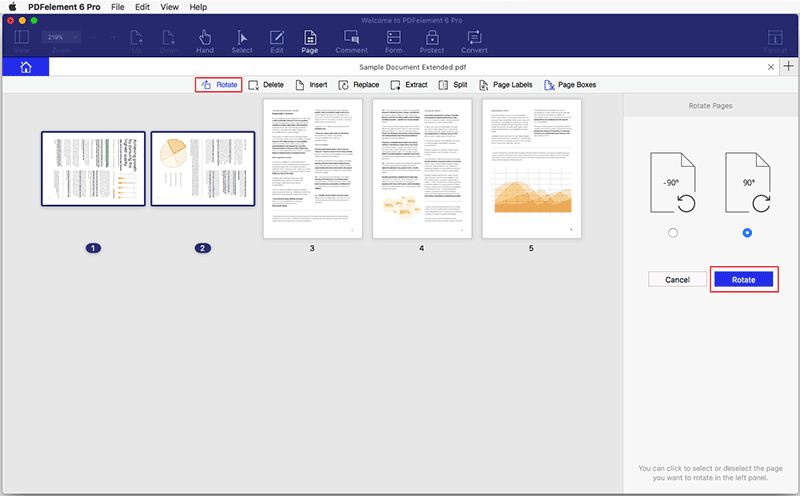
1Rotate PDF Pages
-
Click the "Page">"Rotate" button in the toolbar.
-
Click a single page or hold the Command key and click multliples pages to be selected at the same time.
-
Choose a direction on the right side panel, and click the blue "Rotate" button to do.
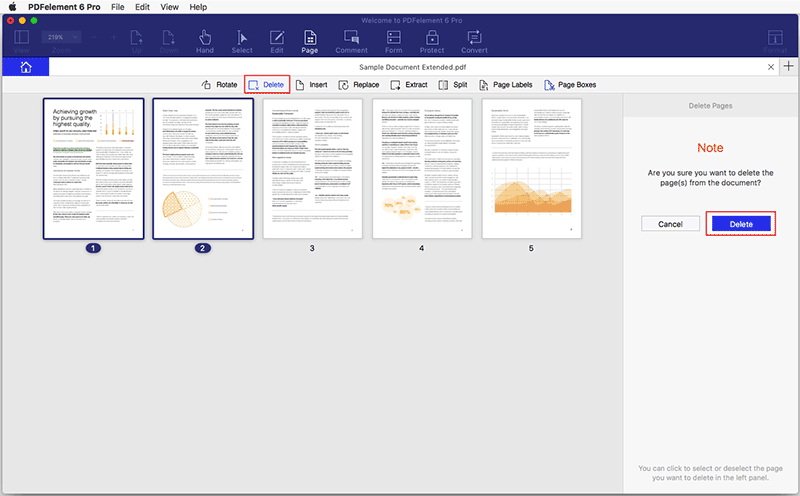
2Delete PDF Pages
-
Click the "Page">"Delete" button in the toolbar.
-
Click a single page or hold the Command key and click multliples pages to be selected at the same time.
-
Click the blue "Delete" button on the right side panel to remove.
3Insert PDF Pages
The program supports to insert pages from another PDF file or insert the blank pages in your PDF file.
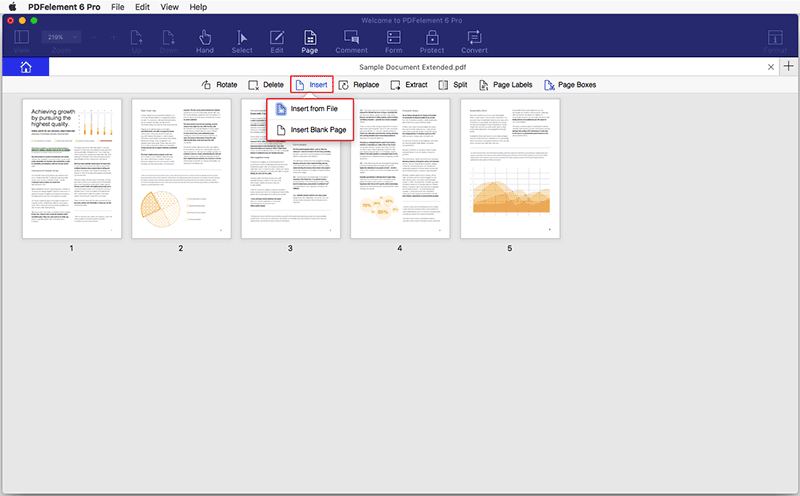
-
Click the "Page">"Insert">"Insert from File" or "Insert Blank Page" button in the toolbar.
-
Browse to select another PDF file that you want to insert. On the right side pane, please select the page that you want to insert in the page number box. Click the page thumbnail to select the page in this current file, and choose the position of "Before" or "After" to add.
-
Click the blue "Add" button to insert directly.
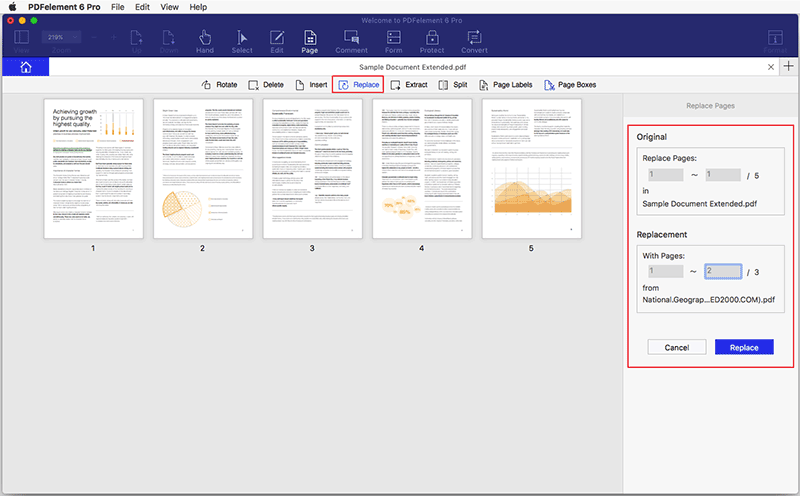
4Replace PDF Pages
-
Click the "Page">"Replce"> button in the toolbar, then browse to select another PDF file that you want to replace the original with.
-
Set the page range in the "Original" and "Replacement" options
-
Click the blue "Replace" button to complete the process.
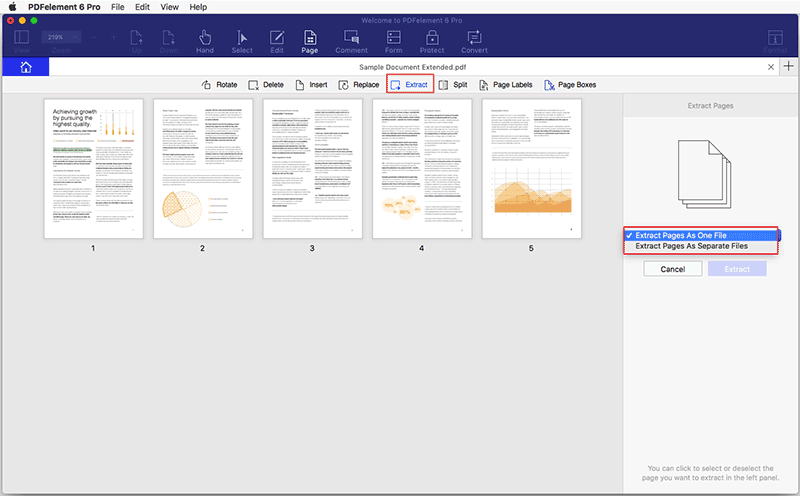
5Extract PDF Pages
-
Click the "Pages">"Extract" option in the toolbar.
-
Click a single page or hold the Command key and click multliples pages to be selected at the same time.
-
Choose to "Extract Pages as One File" or "Extract Pages as Separate Files".
-
Click the blue "Extract" button to extract and select an output folder to save the new file.
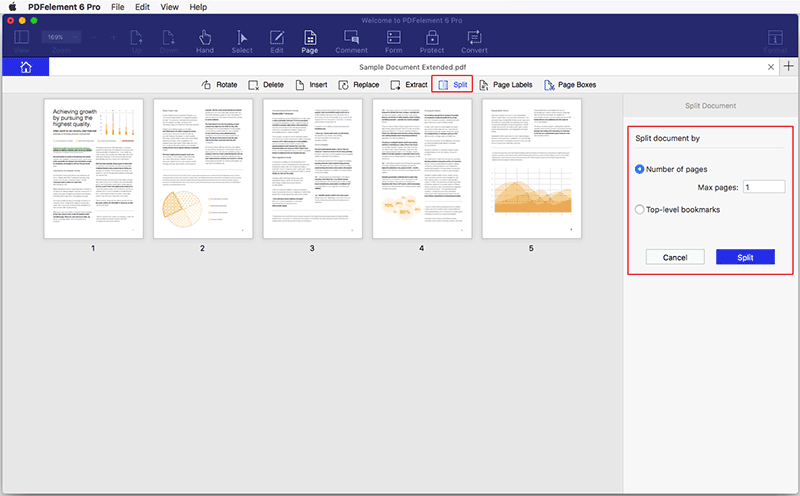
6Split PDF Pages
-
Go to the "Page">"Split" option in the toolbar.
-
You can split document by number of pages or top-level bookmarks. If you want to split each page into an individual new PDF, then please choose the first option of "Number of pages" and enter 1 in the box for "Max pages".
-
Click the blue "Split" button, then select the output folder to save the split PDFs.
-
After completing, the output folder will be opened automatically.
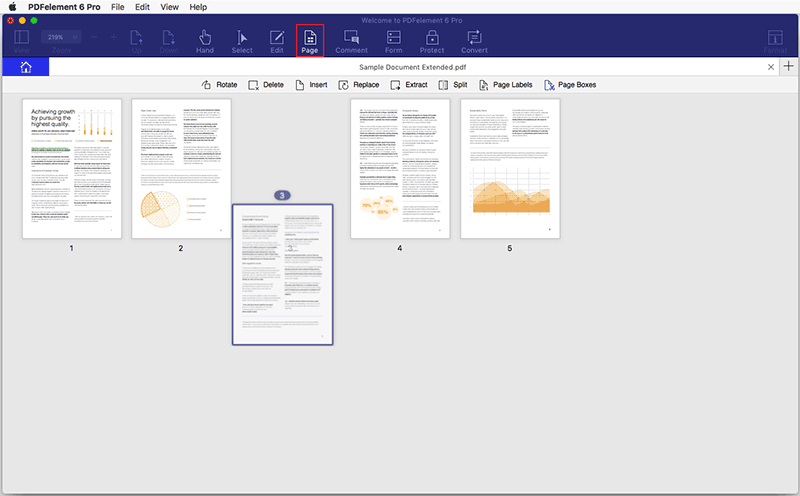
7Change PDF Pages order
-
Please go to the "Page" option, then click the page thumbnail that you want to move and drag it to the correct place in the document.
-
Alternatively, you can hold the Command key and select multiple page thumbnails to allow for the movement of multiple pages at the same time, into the correct location in the document.
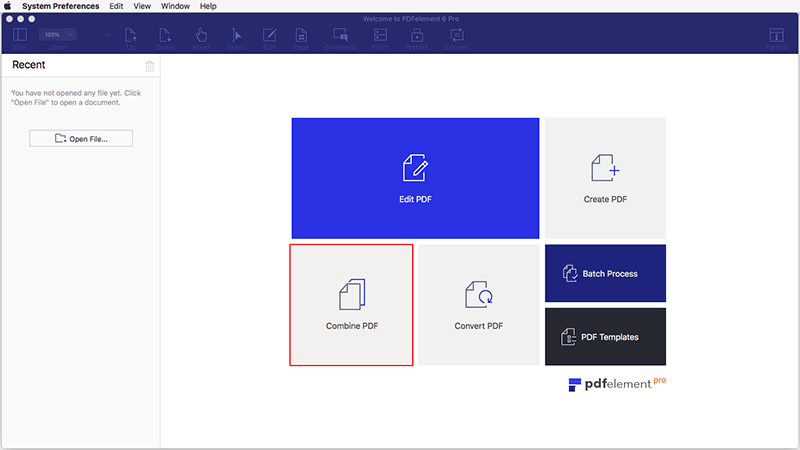
8Combine Multiple PDFs into One
-
After opening the prorgam, please click the "Combine PDF" box in the welcome window.
-
Load all of the PDFs that you need to combine into the program.
-
Choose the page size or customize the size as you want in the box, and click the "Combine" button to start the process.
-
Choose the output folder, and also rename the combined file before you save it.
-
After combination, the output folder will be opened automatically.
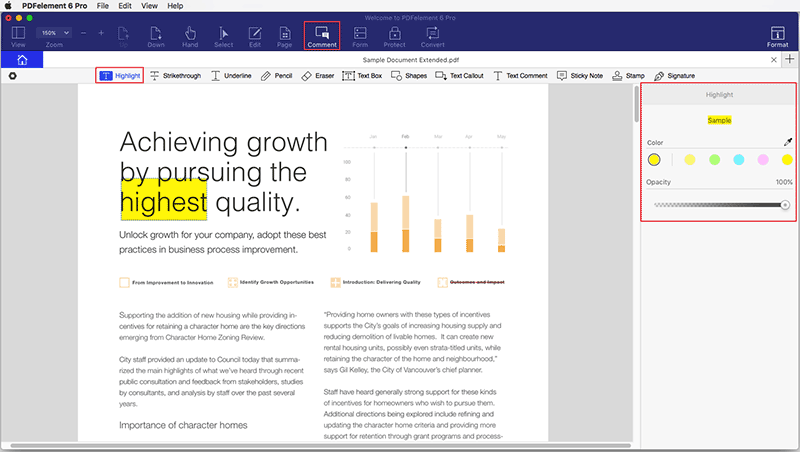
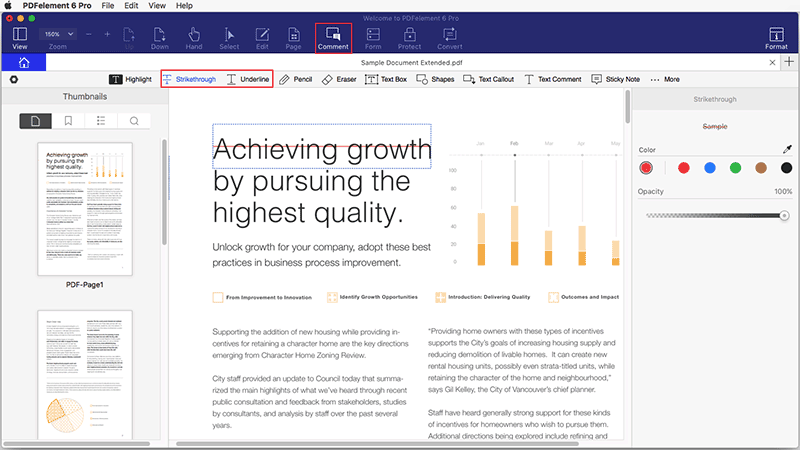
Text Markups
-
Highlight: To mark important passages of text with a fluorescent marker as a means of memory retention or for later reference.
-
Strikethrough: By using the "Strikethrough" option, you indicate that the text is to be ignored or deleted.
-
Underline: To indicate that there is emphasis on the information through an underline.
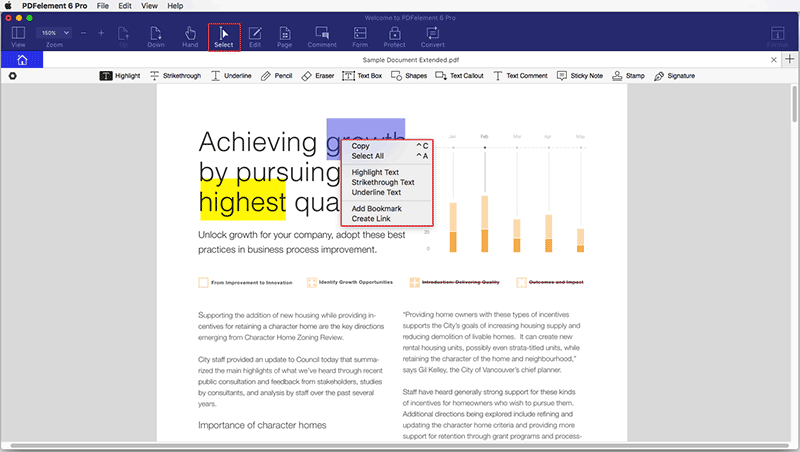
1Highlight PDF Text
-
After opening your PDF file in the program, please click the "Comment">"Highlight" button.
-
Select teh text you need and it will be highlighted immediately.
The highlight properties panel will open on the right side status panel. You can choose the color and opacity as you need. The last hihglight will change to the one you choose automatically.
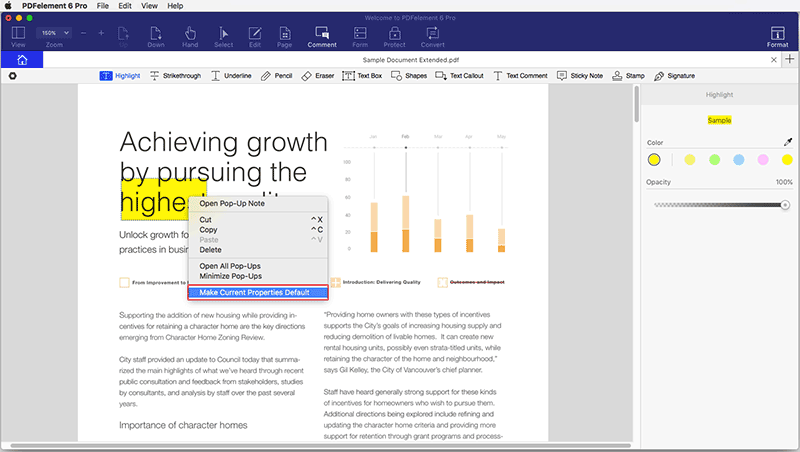
2Edit Highlight Properties
-
Click the drop-down arrow icon besides the "Highlight" button and select the section that you wish to alter the highlight color on.
-
Select the Make Properties Default option under the Comment Properties submenu to set the default appearance of highlight.
-
Check the option of "Keep Tool Selected" on the bottom of the comment properties submenu to adda highlight continuously without clicking on the "Highlight" button every time.
3Add Strikethrough/Underline to PDF Text
-
After opening the PDF file in the program, please click the "Comment" button to get more tools.
- Then please click the "Strikethrough" or "Underline" button, select the text you need underlined or to have a strikethrough and the operation will be applied immediately.
4Quick Access to Markup
After opening a PDF file in the program to view, the "Select" button is enabled automatically. You can choose the text first, then control-click the selected text to get the quick access menu.
Comments
A comment is a written note intended as an opinion, an example, an illustration, or a statement of fact or opinion, especially a remark that expresses a personal reaction or attitude. You can also edit, delete and move the comments with ease.
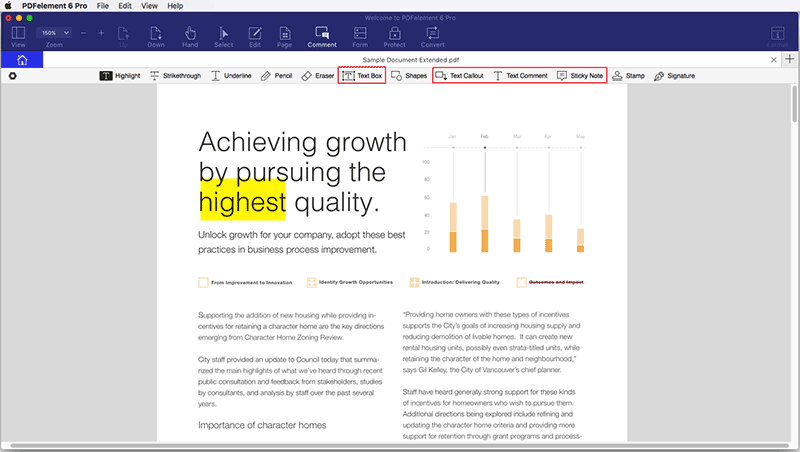
1Add Text Comment/Sticky Notes/Text Box/Callout
After opening a PDF file in the program, please click the "Comment" button, you will get more options on the toolbar. Click on the desired tool and then choose the location in the PDF file that you need to add this comment.
-
Text Comment: You can leave a Text Comment to indicate content modification or suggestion.
-
Sticky Note: To leave your comments or instructions on the PDF pages, you can use the "Add Sticky Note" function which can help direct the readers to a specific text area.
-
Text Box: The "Text box " option allows you to add an always visible box of text, allowing you to bring attention to important text in the PDF.
-
Text Callout: It is often used to add a specific note in a PDF page, or indicate an important aspect of the document.
2Make Default Properties for Comments
After adding one comment in the PDF, you can change its properties on the right side panel. Then control-click the comment to choose "Make Current Properties Default". This allows for a uniform style for all of your comments in that specific PDF document.
3Move/Copy/Paste/Delete Comments
After opening a PDF file with the comments in it, please click the "Comment" button, then click the comment to select it. You can then press the Delete key to delete the comment, or click the Comment Panel on the left side, then click the comment, and press Delete key to delete.
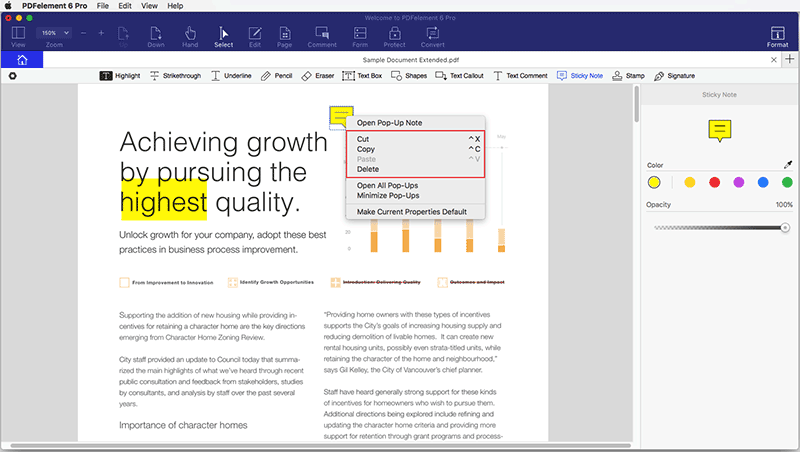
Pressing Command+C will make a copy of the selected text/image, and then pressing Command+V will allow you to paste as many copies as required. As an alternative, Control-click on the comment to choose "Copy" and "Paste" as needed.
Note: The Sticky Notes/Text Box/Typewriter comment can only be moved, copied and pasted within the same page, and are unable to be moved across different pages.
Stamps
Stamp annotations help indicate the status of PDF pages. There are some built-in stamps available in PDFelement 6 for Mac, and you can create your own signature or images as the stamps.
1Built-in Stamp
-
Clicking the "Comment" button will enable more tools for use. Click the "More" option to choose "Stamp". You can click a built-in stamp in the right-side panel to add in the PDF page where you need.
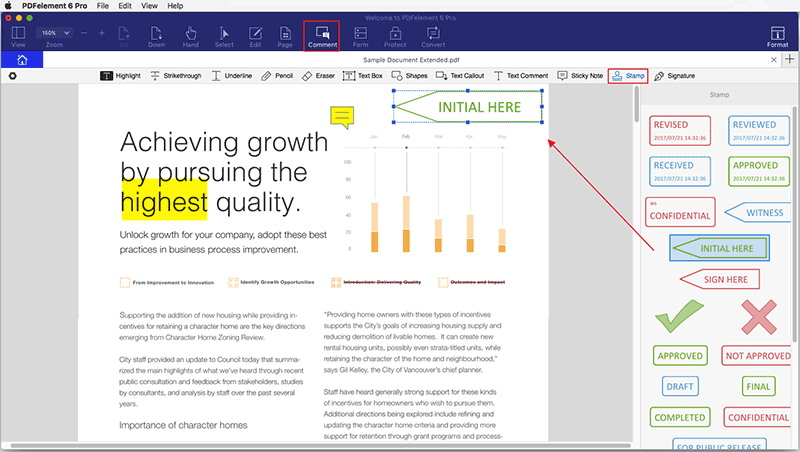
-
Place the mouse curser on one of the eight blue boxes on the edge of the stamp to allow for resizing through dragging in the direction needed. It's also possible to drag the stamp by clicking and holding on it, or by using the arrow keys for precise movements.
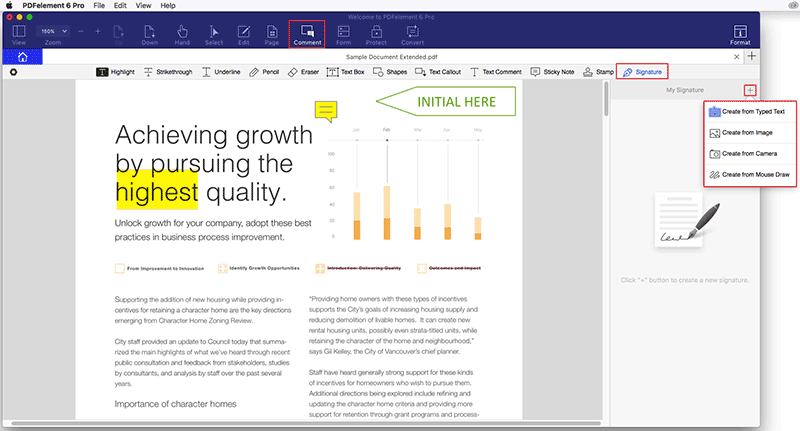
2Signature
You can create your signature or other images as the stamp to add in your PDF file. There are four types to create: Type, Image, Camera and Draw. After clicking the "Comment">"More" button, please click the "+" button to choose the one you want.
-
Type: Use the keyboard to type the signature, choose the font, typeface, color and opacity as you want to create.
-
Image: Browse an image from your computer to create that stamp, and use the red box that outlines it to crop the image size to create the stamp.
-
Camera: Make sure of the camera to take a photo, or even to import an image of your hand-written signature that you have signed on a piece of paper beforehand.
-
Draw: Click and hold your mouse to draw in the window. Here you are able to set color, thickness, and opacity for your created stamp.
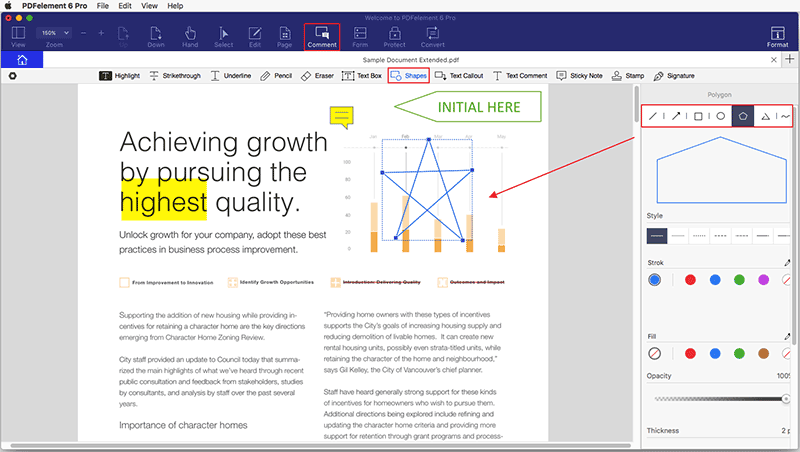
Drawing
The shape tools in PDFelement 6 for Mac help you create specific shapes, like an arrow, line, rectangle, or oval on the PDF page to illustrate your annotations. Here are the steps for using shape tools.
-
Arrow : An option to give a direction that a specific annotation is meant to be attached to.
-
Rectangle : A proofreading symbol used to indicate where something is to be inserted in the document.
-
Polygon : To draw a closed plane figure bounded by three or more lines segments.
-
Line : To mark with a line.
-
Connected Lines : To draw an open plan figure with three or more line segments.
-
Oval : To draw an oval or a circle.
-
Squiggly Line : To draw squiggly line under the text to draw the readers' attention.
1Add Drawing Shapes to PDF
-
Click the "Comment">"Shapes" button, select the shape that you need on the right side panel.
-
Click the PDF page where you wish to add the shape and drag to draw an arrow or line.
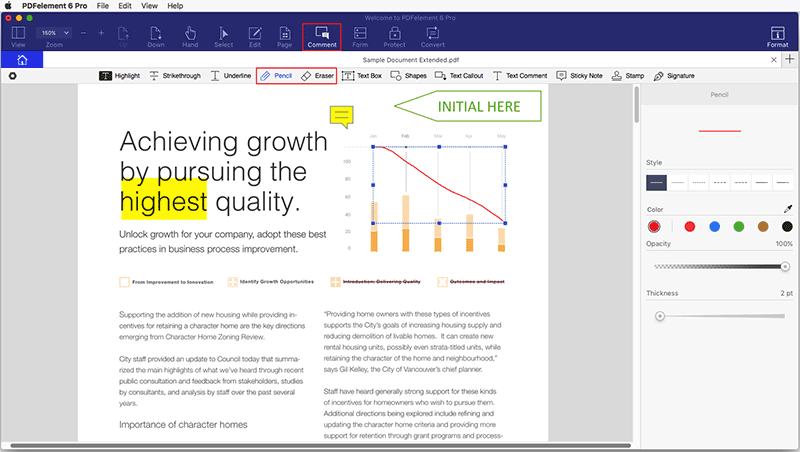
2Use Pencil And Eraser Tools
The Pencil and Eraser tools allow you to draw free-form shapes or lines in the document, and revise them as needed.
-
Go to the "Comment" menu in the toolbar, select the "Pencil" tool.
-
Click and drag the pointer on the PDF to create the image that you need.
-
If modifications need to be made to the drawing after finalizing it, click on the "Eraser"tool to erase the section that needs adjustment.
Fill in Forms
There are two kinds of form files. Once is a PDF file with fillable fields, which enables you to fill the form directly by clicking the form fields without using other features. This is called an Interactive PDF Form. The other kind of form is a plain PDF file with lines and texts, which should be filled with the typewriter feature or create a fillable form in PDFelement. This is called a Non-interactive PDF form.
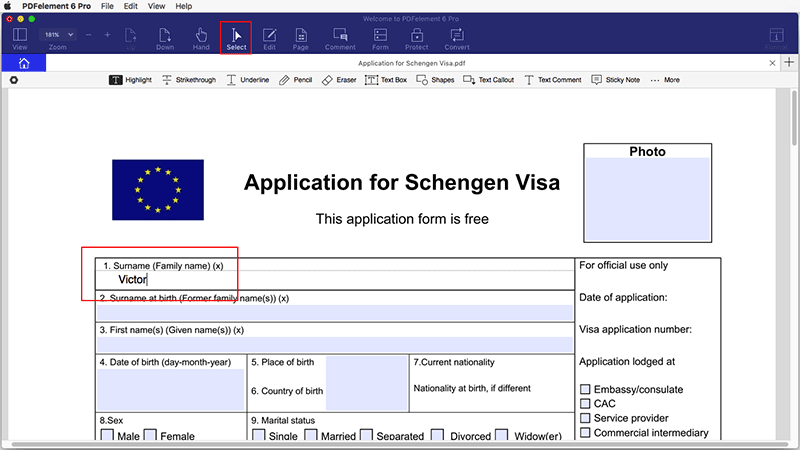
1Fill Interactive Forms
-
To fill in an interactive PDF form, open the form within PDFelement 6 for Mac.
-
Click on the fillable fields or boxes to input text.
-
Click "File>Save" or press Command+S keys to save the electronic form into a local folder.
2Fill Non-interactive Forms
If a PDF form contains non-interactive form fields, you can fill in the form by clicking "Comment">"More">"Text Comment" button to add text.
Create Interactive Forms Manually
PDFelement 6 for Mac provides a complete form toolkit with various form field options which are used to create specific field type. In order to create, please click the "Form" button first, and then click the following buttons below it to create.
-
Text Field : Text filed is used for inputting information allowing for both alpha and numeric values to be included.
-
Check Box : Check boxes allow for multiple selections to be chosen from a list of options given.
-
Radio Button : Radio Buttons are also used for make selection, except for that only one selection is allowed to be checked. Once one of the radio buttons is selected, the remaining buttons will turn to grey and be non-selectable.
-
Dropdown : A Dropdown is used to supply a list that can be accessed by clicking on the downward facing arrow. Once the list has been expanded, a single item can be chosen from the list to fill in the specific field.
-
List Box : List Boxes appear with a scroll bar and the list is able to be scrolled for selection by using the mouse. List Boxes appear with a scroll bar that allow to find a selection by scrolling through a pre-defined list with the mouse. If more than one option from the list is needed, just press the Command key while selecting.
-
Button : Buttons are used for triggering an action, such as submitting the form or resetting the form.
1Add Text Field
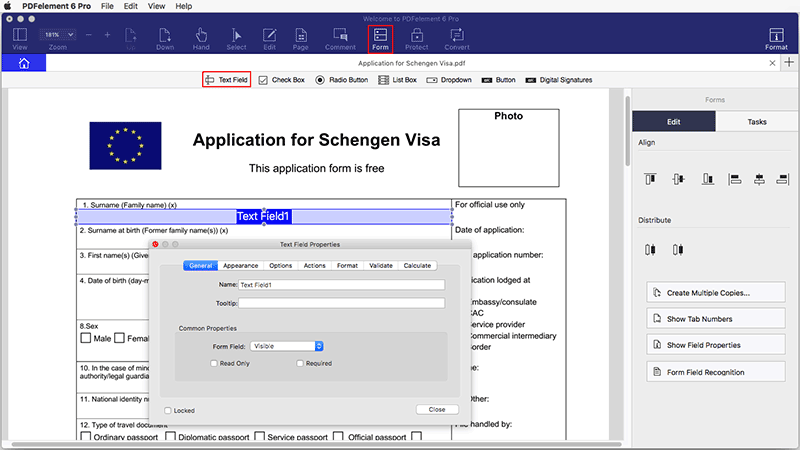
-
Click the "Form" menu to expand form tools on the top toolbar.
-
Select the "Text Field" icon to and then choose the location in the document that you need to add a text field element. The text field will be labeled as "Text Field#" by default.
-
Double-clicking on the text field or click the "Show Field Properties" button on the right side panel to active the properties window which allows for modification. In the "General" tab you are able to alter the name of the field, and if you need to alter the boxes appearance that can be completed through the "Appearance" tab.
-
The "Option" tab allows you to set the alignment mode for the text, and also add in a "Default Value" for the text box if you need.
-
Selecting "Multi-line" or "Scroll long text" options will allow for multiple lines to be entered and also allow for a scroll option to be added to the text field allowing for extra visibility.
-
You can also set a limitation of the number of characters allowed in the text field by clicking "Limit of _ characters".
-
Check the "Comb of characters" to build a comb filed which is meant for typing characters in independent boxes. You can define the character numbers. Please note that this option is incompatible with other options.
-
Create a field for Password entry or file selection.
-
Choose the actions and triggering mode for the text field in the "Actions" tab.
-
To format the text field, select a format category from the "Format".
-
To enable validation of a field you can click on the option in the "Validate" tab.
-
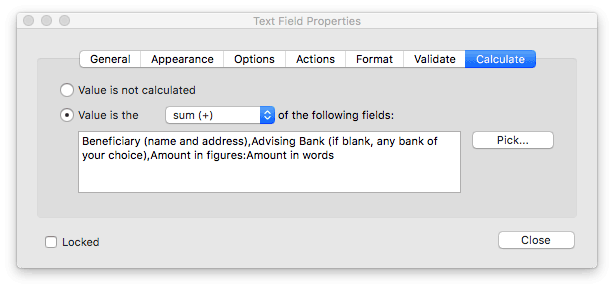
If the data in the text field is for calculation, check the calculation option and define the existing fields in which the data will be calculated by clicking the "Pick" button. For example, the following is the property for textfield 3 on the PDF, and after settings this, it will calculate textfield3=textfield2+textfield1.2.1. This mean that when you input data in textfield2 and textfield1.2.1, textfield3 will get the sum result automatically.
2Add Multiple Text Fields

If you need to create more than one text field, control-click on the text field that you have added and select the "Create Multiple Copies" option on the right side panel, choose the form copy amount and location as you need.
3Add Check Box
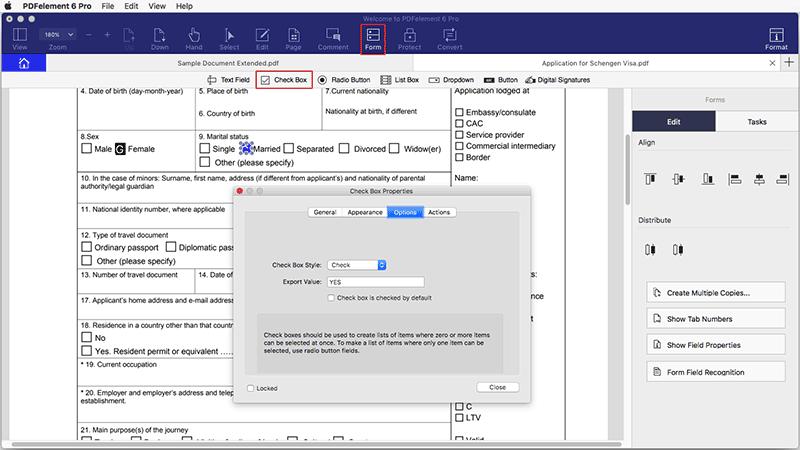
-
Under the "Form" tab, click the "Check Box" icon, and drag the mouse to the place that you require the check box.
-
Double-click on the check box, and define its name, appearance as needed.
-
In the "Options" tab, you can pick the check box style and modify the export value. If you want to set a default value for the check box, choose the "Check box is checked by default" option.
-
Choose the triggering actions for the check box in the "Action" tab.
4Add Radio Button
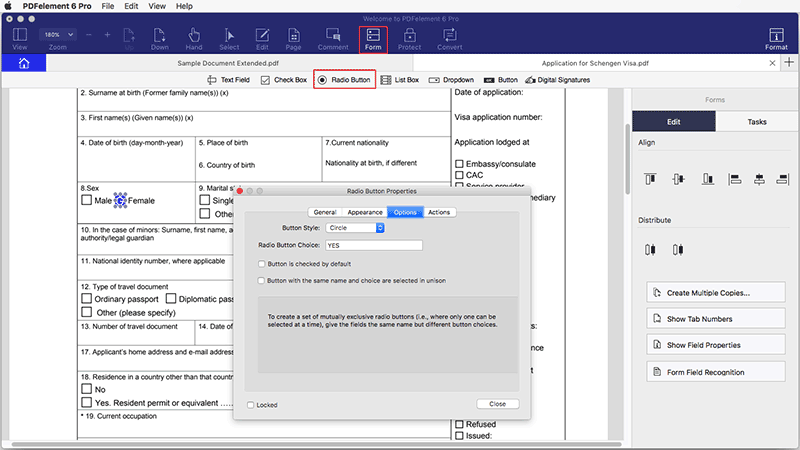
-
To add a radio button, select the radio button icon under the "Form" tab, click on the PDF page.
-
Double-click the radio button, and set the name and appearance for it in the "General" and "Appearance" tab.
-
Select the button style under the "Options" tab, and here you can also define the radio button choice by entering the value.
-
If you want all radio buttons checked when one button is selected, check the option of "Button with the same name and choice are selected in unison".
-
Modify the actions for the radio button in the "Actions" tab.
5Add Dropdown
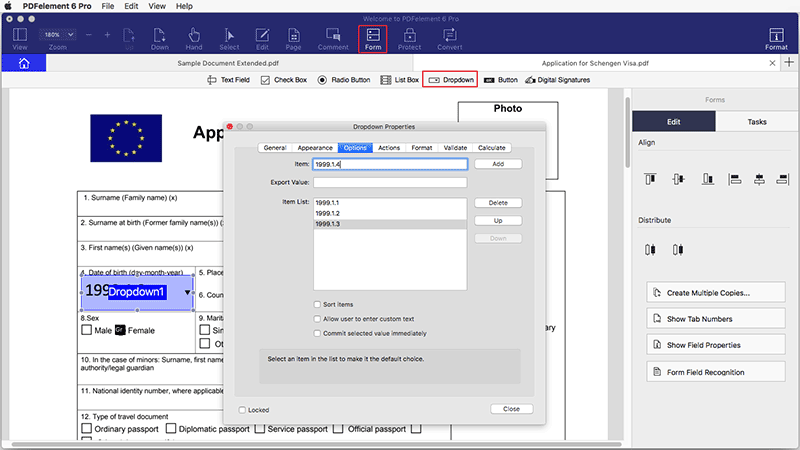
-
Under the "Form" tab, click the "Dropdown" icon.
-
On the PDF page move your mouse curser to where you need to input the field.
-
Double-click the field, type the name in the "General" window and modify the appearance in the "Appearance" window.
-
In the "Options" tab, add an item and enter an export value in the Export Value text box. Repeat this step until you have all of the items that you need listed.
-
Check the "Sort items" option if you want all the items stored by alphabetical order. To manually reorder the items, choose the item and click the "Up/Down" buttons. If you want to remove an item, select it and click the "Delete" button.
-
If you are looking to have the information submitted by the user, check the "Allow customer text input" option.
6Add List Box
Find the list box icon from the "Form" tab, click on the page to insert the list box.
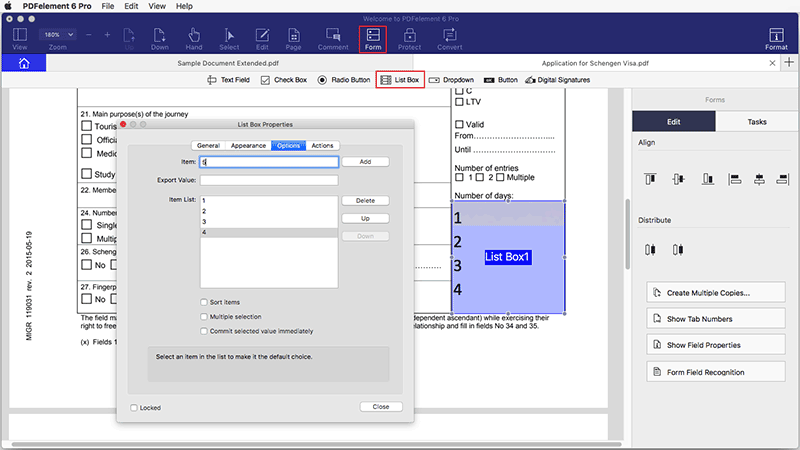
-
In the "Option" window, name the new item that you are including and then include an export value into the "Export Value" field.
-
You can arrange the items by alphabetic order by clicking "Sort items".
-
If you want the respondent to select multiple items, check the "Multiple selection" option. If multiple items are able to be chosen, select the "Multiple selection" option.
-
Create actions for the list box field in the "Action" window.
7Add Button
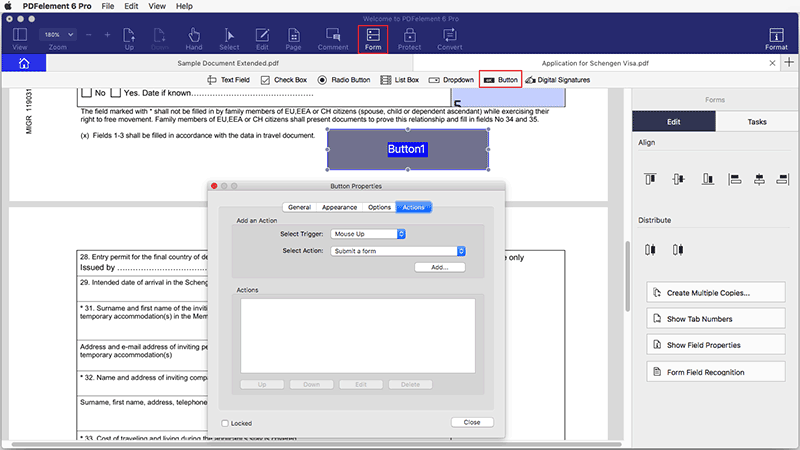
-
Click the "Button" icon under the "Form" tab.
-
Move your curser to the location in the PDF page and add the button by clicking on the chosen location.
-
Double-click the button field, name it and modify the appearance.
-
In the "Option" window, you can define the button layout. Choose your preferred icon from local folder and give it a label in the Labe text box, and then select the button layout as well as the behavior.
-
Customize the actions for the button field in the "Actions" window.
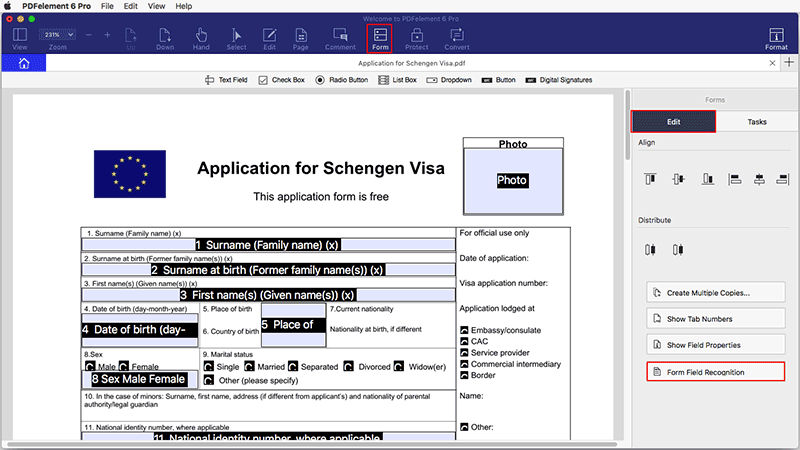
Create Interactive Forms Automatically
(Only available in PDFelement 6 Professional for Mac version)
- PDFelement 6 Pro supports to create interactive forms automatically with one click, which can dramatically improve your efficiency. If you have a non-interactive PDF form containing blank lines and tables, the document is not a fillable form and will not be useable.
- After opening it in our program, you can click the "Form" button, then click the "Form Field Recognition" button on the right side to recognize the blanks and tables automatically, then you will get the fillable fields created. All the corresponding type of form fields will be automatically named with the text near the form fields.
- Click the "Select" button in the toolbar, then place the cursor in the field that you wish to fill in, and enter the information requested.
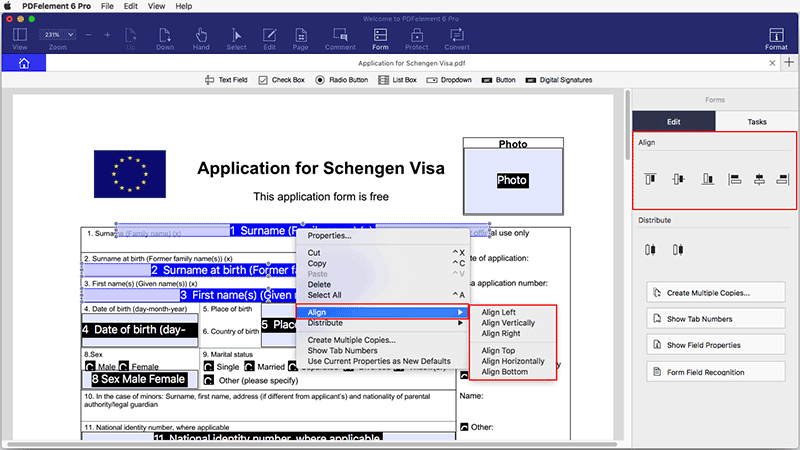
Form Alignment
PDFelement 6 for Mac supports selecting multiple form fields, so you can align and distribute the form fields easily.
-
After opening the PDF file with the interactive forms, please click the "Form" button.
-
Hold the Command key to click multiple fields to select them at the same time.
-
Click the "Align" or "Distribute" options on the right side panel to align.
Form Properties
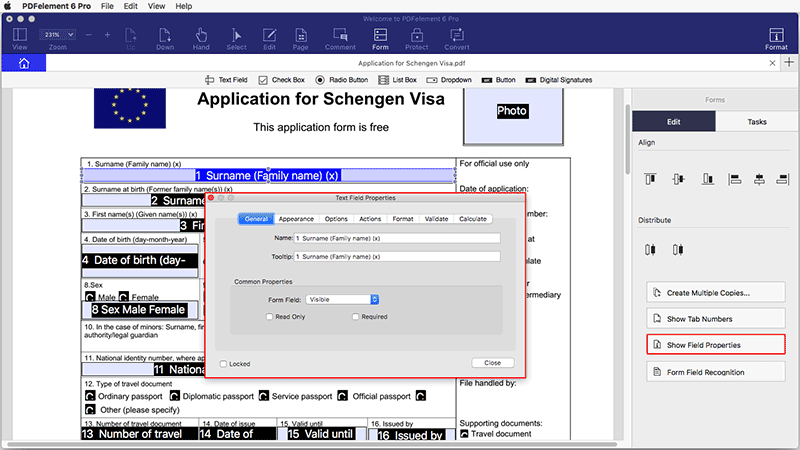
With Wondershare PDFelement 6 for Mac, you can easily edit PDF form elements. Click the "Form" button, double-click one field, or choose the button of "Show Field Properties" on the right side panel. Here you will get several options on the right side to edit.
-
Create Multiple Copies: Select the form field that you want to copy, and click the "Create Multiple Copies" button. Type in the number of fields that will be created and modify the overall size for those copies.
-
Show Tab Numbers: After clicking this button, you will see the number order show on those fields according to the creation order.
-
Show Field Properties: Click a form filed and then hit the "Show Field Properties". This will open the properties modification window to allow for editing. Please note that this operation does not work for multiple form fields.
Extract Data
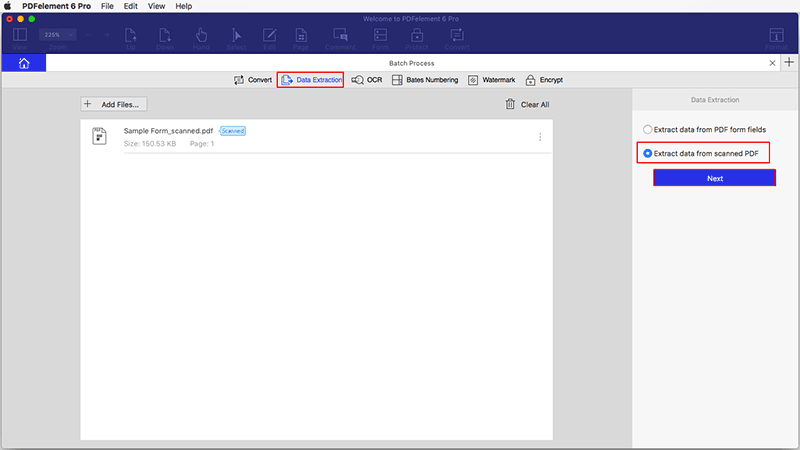
(Only available in PDFelement 6 Professional for Mac version)
PDFelement 6 Pro for Mac can assist you in extracting data from fillable form fields and scanned PDF to a CSV file, where you can manage the data that has been extracted.
1Extract Data from A Single PDF
- If your PDF file is a scanned file or a fillable form, you can click the "Form" button, then click the "Data Extraction" button in the "Tasks" tab on the right side panel, then select the method you want to use. If your PDF file is not a scanned file and also does not contain the fillable form fields, please refer to the chapters of "Create Interactive Forms Automatically" or "Create Interactive Forms Manually" to create the fillable forms first.

- If you are extracting data from a scanned file, you will get the following message, click the "Start" button. Using your mouse, click and hold to select the area you wish to extract. You can select as many areas as you want.
- After selecting all the areas that you want to extract, please click the "Start" button, to save the current setting for future use.
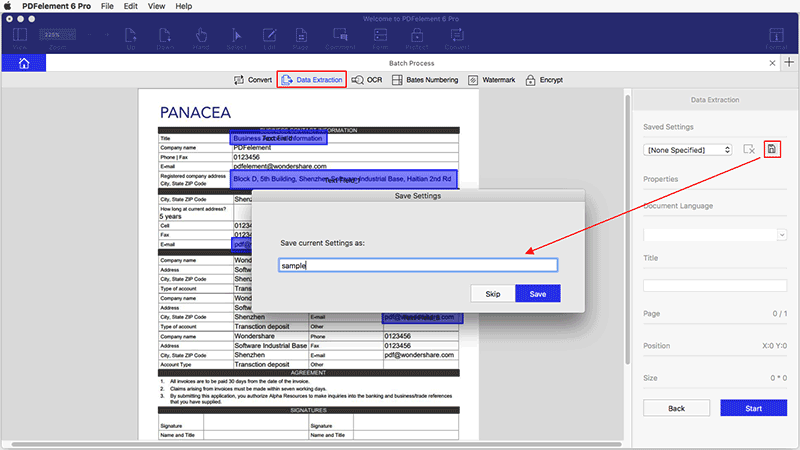
- Choose the output folder to save the extracted CSV file.
- After completing the process, the output folder will be opened automatically.
2Extract Data for Batch Process
The batch process is an excellent tool to use if you have a form that has been filled in multiple times to collect different data, or if you have scanned PDFs that you need to extract data from the same area.
- After opening the program, please click the "Batch Process" box to open.
- Click the "Data Extraction" tab to load multiple files in it, then choose the "Mode" for the extraction process.
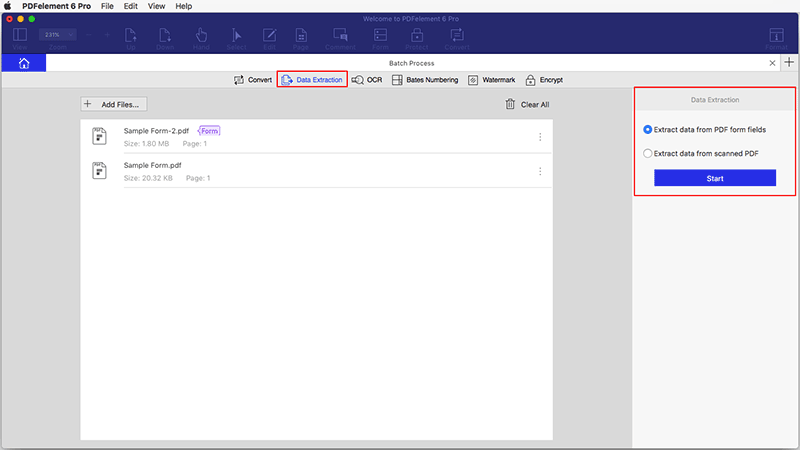
- If you are extracting multiple scanned PDFs, the areas you set previously can be chosen in the "Saved Settings" box on the right side. If there are no settings saved previously, click and hold the mouse to draw the areas you wish to extract, and click on "Start" to begin.

- Select the output folder to save the extracted CSV file on your Mac.
Clear/Import/Export Form Data
To import and export form data is only for PDF interactive forms. All the options for importing and exporting form data will be unavailable when you open other interactive PDFs or non-interactive forms. The import and export data can only be Form Data Format (.FDF).
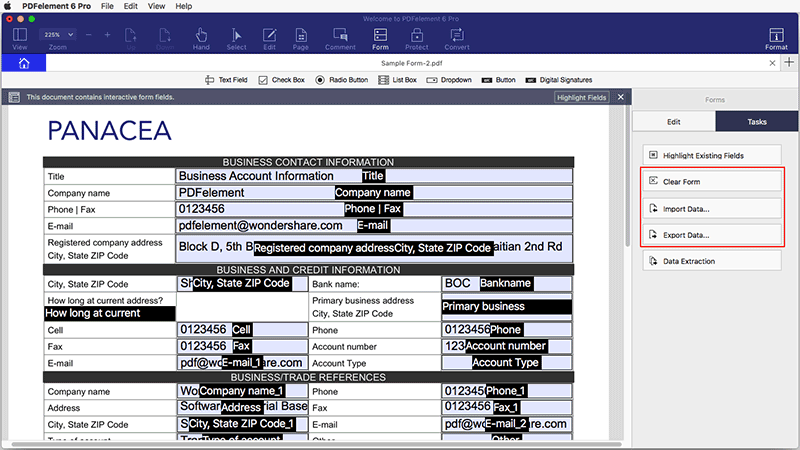
1Clear Form
-
To remove the value that has been filled in the form fields, click the "Forms" button in Toolbar.
-
Select one form field, go to the right side Pane and select "Clear Form" under the "Tasks" menu to remove the form data.
2Import Form Data
-
Click the "Import Data" button and select the .fdf format file from local folder.
-
Click "OK" to import data.
3Export Form Data
-
Click the "Export Data" button under the "Other Task" menu on the right side.
-
Set a destination folder to save the exported data as a .fdf format file saved on the Mac.
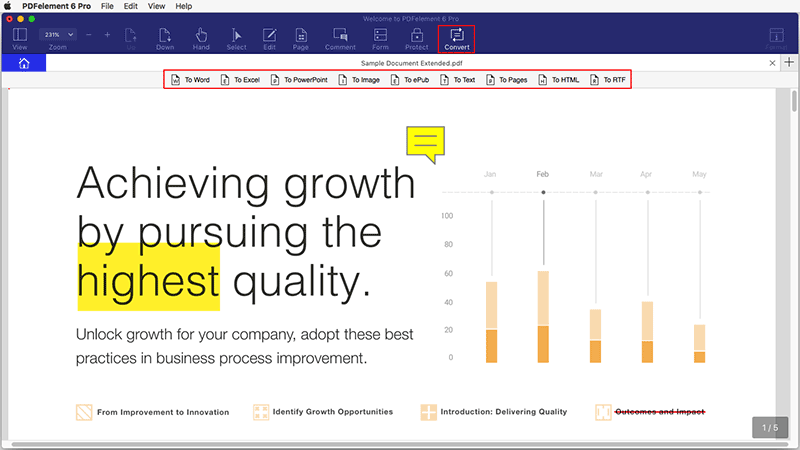
Supported Output Formats
PDFelement Pro for Mac supports converting PDF files to many other formats such as:
-
PDF to Word: Convert PDF to Microsoft Word (.doc & .docx)
-
PDF to Excel: Convert PDF to Microsoft Excel (.xls & .xlsx)
-
PDF to PPT: Convert PDF to Microsoft PowerPoint (.pptx)
-
PDF to Pages: Convert PDF to Word Processing (.pages) format
-
PDF to Text: Convert PDF to Text (.txt) format
-
PDF to Epub: Convert PDF to Electrical Publication format (.epub)
-
PDF to HTML: Convert PDF to Hyper Text Markup Language format
-
PDF to Image: Convert PDF to Image formats like JPG, PNG, GIF, BMP, and TIFF
-
PDF to RTF: Convert PDF to Rich Text format (.rtf)
Convert
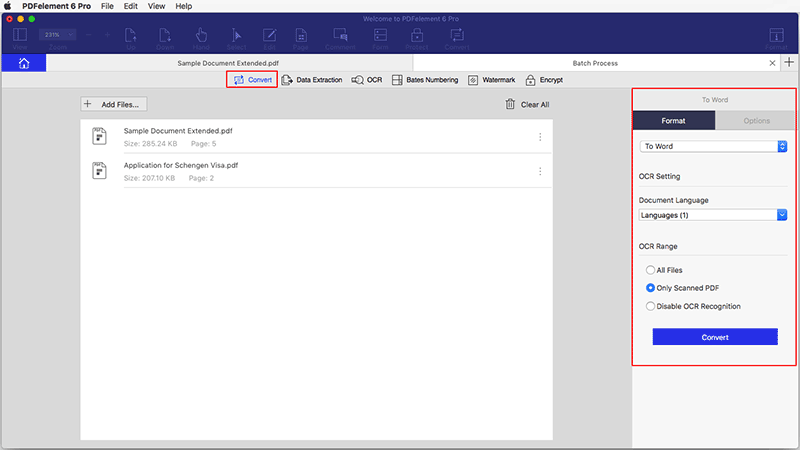
1Convert A Single PDF
-
After opeing the PDF file in the program, click the "Convert" button in the toolbar.
-
Choose "To Word" or another output format as needed.
-
Click the "Options" tab on the right side panel to set the page range or other settings for the output format file. The settings will be different depending on the output format that is chosen.
-
After setting, click the "Convert" button and choose the output folder where you want to save the file, and start the process.
2Convert A Batch of PDFs
(Only available in PDFelement 6 Professional for Mac version)
-
After opeing the program, click the "Batch Process" box in the welcome window.
-
Choose the "Convert" tab and select the PDF files to add to the program.
-
Choose the "Format" on the right side panel. If you choose "To Excel" as the output format, then click the "Options" tab to choose to "Convert each page to a separate worksheet" or "Convert all pages to a single worksheet".
-
Click the blue "Convert" button to start to the process.
Convert Scanned PDFs to Editable Files
(Only available in PDFelement 6 Professional for Mac version)
There are two methods to convert the scanned PDF files or the image-based PDF files to the editable files.
Method 1 is to perform OCR first, please refer to the chapter of
"Perform OCR for A Single Scanned PDF" for more instructions about how to perform the OCR function. After performing OCR, please click the "Convert" button to convert the newly created PDF file to an editable file in the format required.
Method 2 please do the following steps:
-
After opening the scanned PDF files in the program window, please click the "Convert" button, then choose the output format as needed.
-
Please enable the OCR slider on the right side panel. And please select the correct language of your PDF content in the "Document Language" box.
-
Click the "Convert" button, and then choose an output folder to start the conversion.

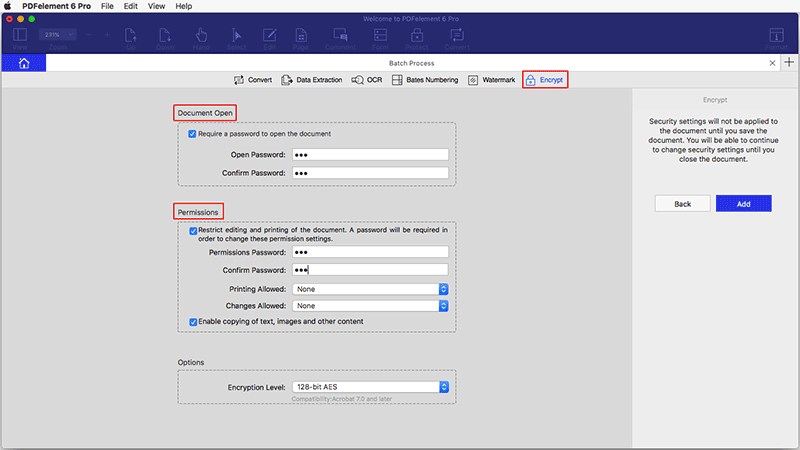
Password and Permissions
PDF security includes features like encryption and permissions that ensure data integrity. For security reasons, it may be required to limit who is able to open, edit, or a print a PDF document. Wondershare PDFelement for Mac supports setting open password or permission password to your PDF files.
1Encrypt with Password
You can encrypt your PDFf file with Open Password or the Permission Password. If you set the open password to your document, users will be asked to input the password before opening the document. Without the correct password, the document cannot be reviewed. You can restrict certain users to view your PDF by setting an Open Password. If you set the permsision password to your document, users will be asked to input the password before editing or changing this PDF document.
Open Password
-
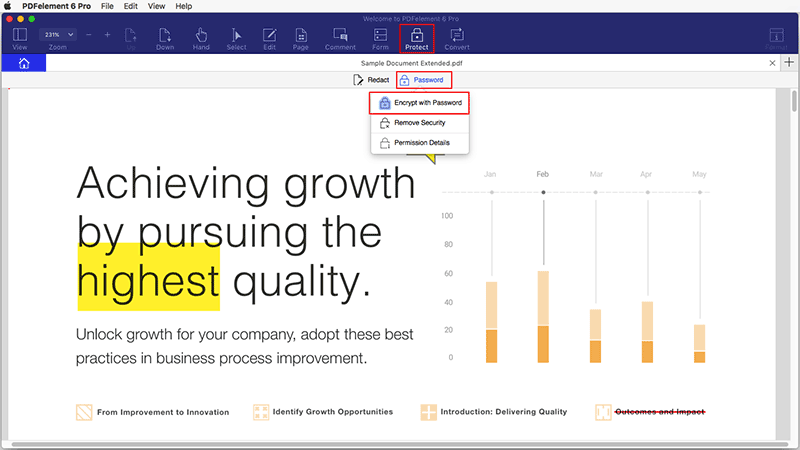
After opening the PDF file in the program, please click the "Protect">"Password">"Encrypt with Password" button.
-
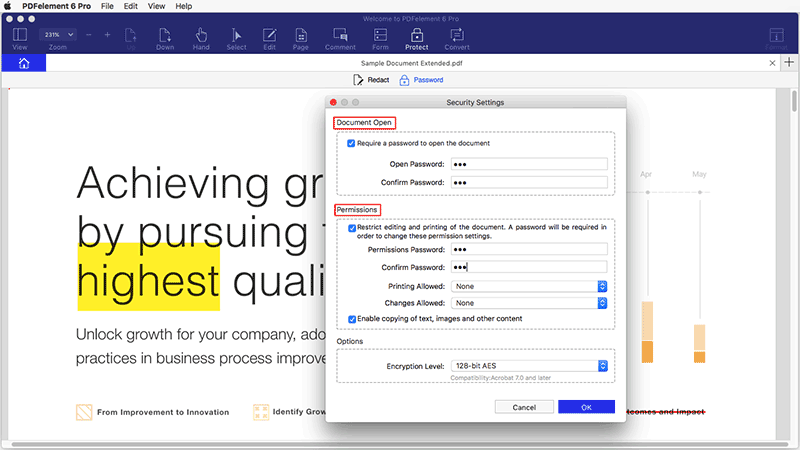
In the pop up Security Settings window, you can choose to set the security.
-
Tick to check "Require a password to open the document" option, and then type your password twice to confirm it.
Note: As there is no way to recover or open the document if the password is lost/forgotten, be sure to use one that you will remember.
Permission Password
-
Printing Allowed: Set permission for printing the document, and at what resolution quality.
-
Changes Allowed: Customize permissions for the modifications that can be made to the current PDF document.
Steps to create permission password are as below:
-
Tick to check "Restrict editing and printing of the document", enter the permission password and confirm it in the "Confirm Password" box. You can customize the encryption level by adding complex password groups. The higher the encryption level, the more difficult it is to crack the password.
-
Click the "OK" button to set the password and finally don't forget to save the document.
2Remove Security
-
Open the "Protect" menu. Then click the "Remove Security" button.
-
There will be a pop-up window asking you to enter the permission password. Without that password, you will not be able to remove the security, thus be sure to remember the password used on that document.
-
Click to save the document.
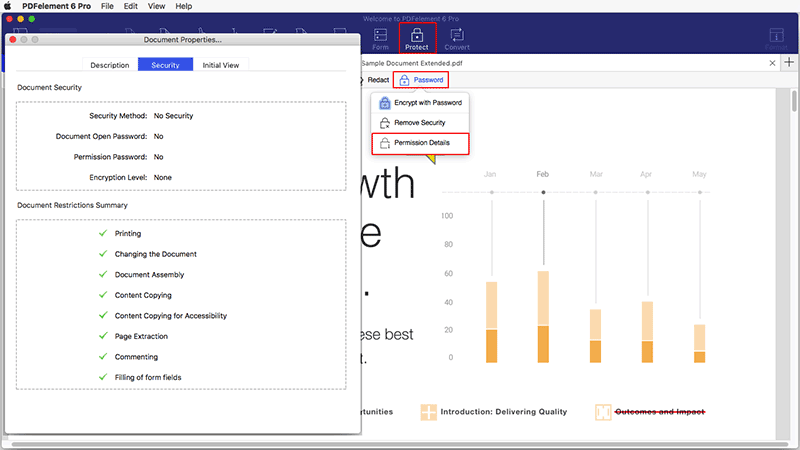
3Check PDF Permissions
You can click "Protect">"Password">"Permission Details" button on the right side to check the permission details.
4Batch Encrypt
(Only available in PDFelement 6 Professional for Mac version)
You can add the same password to a batch of PDF files by clicking the "Batch Process" box in the welcome window, then select the "Encrypt" button. Load multiple PDF files in the program, and click the "Next" button to set the open password or the permission password as you need.
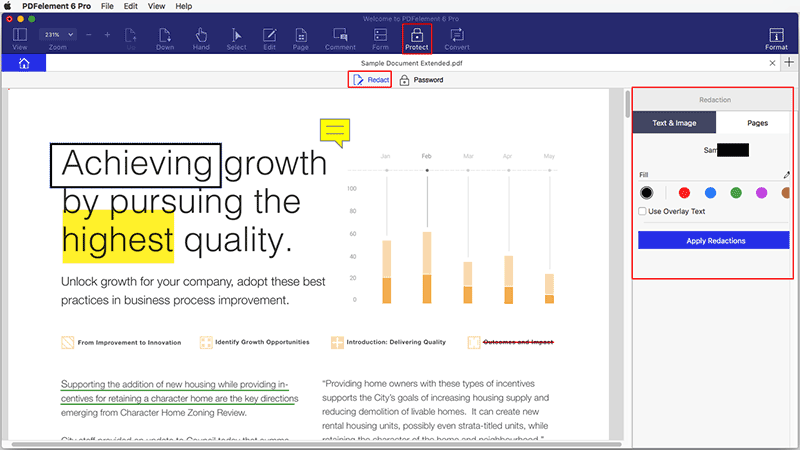
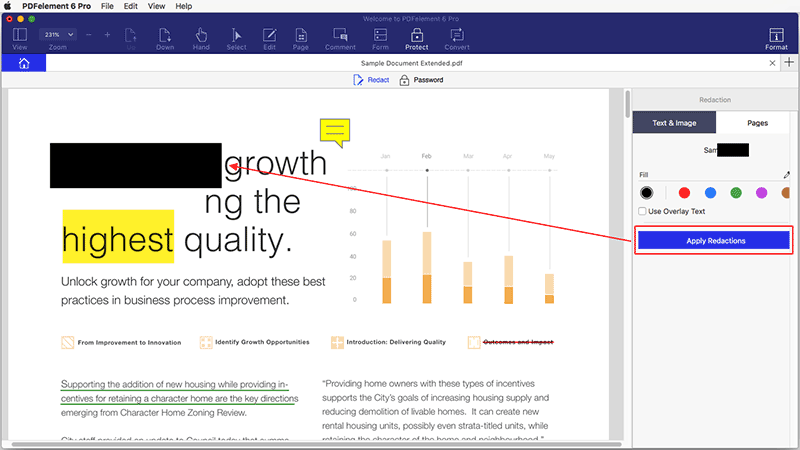
Redaction
(Only available in PDFelement 6 Professional for Mac version)
After clicking the "Protect">"Redact" button, click and hold the mouse button to draw the area to select the text or image you want to redact.
Choose the color you want, and you can also go to the "Pages" tab to choose the page range as you want.
Then click the "Apply Redactions" button, click "OK" in the pop up window. The selected area has been redacted.
Optimize PDF
(Only available in PDFelement 6 Professional for Mac version)
The optimize function can help reduce the file size of a document to facilitate transferring and saving in a local folder. With PDFelement 6 for Mac, you can use the optimize function to compress the file size and remove unwanted objects for your PDF files. Here are the steps for optimizing your PDF file.
- Move to the top header bar and click the "File" menu.
- Click the "Optimize PDF" button from the drop down menu.
- Choose an ideal compression quality from the "Options" list to preview and then save the optimized file in a local folder as you want.
Print Options
- Click the "File">"Print" button on the toolbar or hit "Command + P" on the keyboards to active the print command window.
- In the pop-up Print window you will be able to choose the printer, set the copies you need to print, and customize the pages. You will be shown a preview of how the printed document will appear.
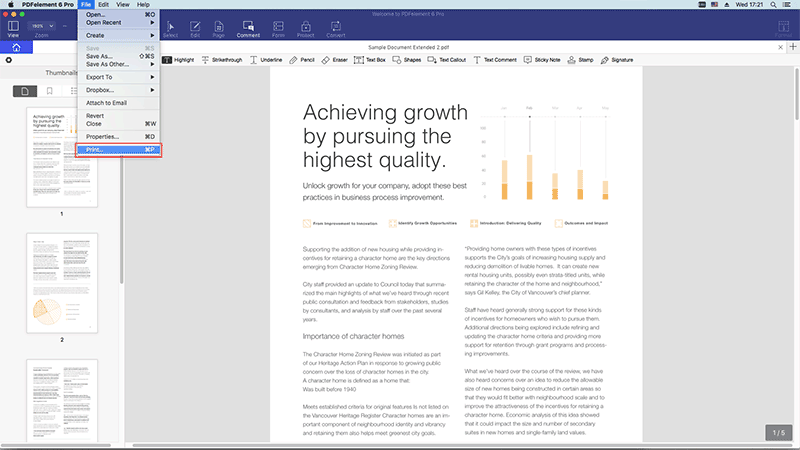
- In details, you can choose the preset of printing properties, like the paper size, orientation, scale etc.
- After the settings, click "Print" and then you will get the paper copy.
Print Properties
To access more settings for printing PDF, click the "Show Details" button on the Print window.
- Printer: Choose the printer that is connected to your Mac.
- Copies: Enter the copy number for output papers.
- Pages: Choose All or customize the page range.
- Page Size: Select the appropriate page size for the current PDF files, like A4, A5 or US Letter, etc.
- Orientation: Choose to print in Portrait or Landscape, and select the Scale percentage as needed.
- Comments & Forms: Choose the option to print comment and forms in the PDF as well.
User Guide
You can find detailed instructions on how each feature operates, or specify a particular topic for help via the title of each chapter in the Quick Guide.
FAQ
You can find the frequently asked questions in this part about Pre-sales, Registration, Functionality and Install/Uninstall.
Forum
A community to ask questions, share opinions, or check out the latest hot topics.